
64-bit Arch Linux ARM on a Raspberry Pi 4 Model B with 8 GB of RAM
Update - 2021-05-28
These instructions are deprecated, but might still be relevant for anyone on Arch Linux ARM who wants to switch over to the Raspberry Pi Foundation’s kernel. New instructions can be found here.
Introduction
In May 2020, the Raspberry Pi Foundation launched the Raspberry Pi 4 Model B with 8 GB of RAM, which shortly afterwards replaced the now unavailable 1 GB model. Everyone rejoiced, for more memory is (almost) always better.
A new revision of the board was made to accommodate 8 GB of RAM. Some Raspberry Pi 4 supporting Linux distributions and underlying software have not caught on to these differences yet. This can result in several problems which were found in Arch Linux ARM running in 64-bit mode (‘aarch64’). A possible workaround for these problems is installing the better supported 32-bit version (‘armv7h’) of Arch Linux ARM. However, this would limit processes in the maximum amount of RAM they can use, which somewhat limits the usefulness of an 8 GB Raspberry Pi.
The problems with 64-bit (‘aarch64’) Ach Linux ARM on a Raspberry Pi 4 with 8 GB are as follows:
- The included boot loader (Das U-Boot) (build on 18 January 2021, check here to see the current version) will not boot if a monitor is not attached. This makes headless operation cumbersome. This issue is identified in Ubuntu’s bug tracker. A possible workaround is recompiling the boot loader with PCI support disabled. However, since the firmware of a Raspberry Pi is capable of starting a Linux kernel directly, another acceptable approach is simply to remove Das U-Boot altogether from the boot chain.
- The USB-A 2.0 and 3.0 ports do not function at all with the generic aarch64 kernel that is included with the distribution. This issue is identified in the Arch Linux ARM forum. This can be fixed by not using the generic mainstream kernel, but a Pi 4 specific kernel based on the kernel provided by the Raspberry Pi Foundation. Arch Linux ARM has this kernel available, but it is not installed by default.
- The on-board IEEE 802.11ac wireless adapter might sometimes after booting not work with the generic aarch64 kernel due to a timeout issue. A temporary workaround is simply reloading the driver. The kernel of the Raspberry Pi foundation also solves this issue.
In this guide, I explain how to install 64-bit (‘aarch64’) Arch Linux ARM on a Pi 4 with 8 GB of RAM, and how to work around the noted problems. It is expected that in the future, it is enough to just follow the official installation instructions since these problems should be solved. Only follow these steps if the problems present themselves.
Prerequisites
- A Raspberry Pi 4 Model B with 8 GB of RAM. If you experience some of the noted problems with a Pi 4 with less memory, these instructions might still prove useful if you really want to run a 64-bit (aarch64) Arch Linux ARM installation.
- A microSD card (at least 8 GB recommended). USB and network boot are also supported, but are outside of the scope of this guide. If the noted problems are solved, implementing USB or network boot should be trivial.
- An SD card reader with a microSD adapter, or a microSD card reader. This can either be embedded in a notebook, or a USB (micro)SD card reader can be used.
- A computer (or virtual machine) running an up-to-date Linux distribution to write the microSD card. For this guide Arch Linux was used, but any other modern Linux distribution should do.
- A wired network connection, a UART to USB adapter, or a USB cable to connect the Pi’s USB-C port to a USB host. This is only required for a headless installation.
- An internet connection to update Arch Linux ARM when it is running on the Pi 4.
Prepare the microSD card
This mostly concerns following the official instructions from Arch Linux ARM, but some customization is necessary to support headless, due to the buggy Das U-Boot boot loader that is currently shipped with the 64-bit Arch Linux ARM image for Raspberry Pi’s.
Copy Arch Linux ARM to the microSD card
The following commands concern the installation of Arch Linux ARM to a microSD card, conforming to the official installation instructions.
For these commands, it is assumed that your SD card reader is offered as device /dev/mmcblk0. Adjust the configuration variables if necessary, for example when a USB SD card reader is used. Be careful to not overwrite data on a device you do not want to write to!
You can adjust the download directory in case RAM is limited on the computer used to prepare the microSD card.
Run as root:
export SDDEV=/dev/mmcblk0
export SDPARTBOOT=/dev/mmcblk0p1
export SDPARTROOT=/dev/mmcblk0p2
export SDMOUNT=/mnt/sd
export DOWNLOADDIR=/tmp/pi

mkdir -p $DOWNLOADDIR
(
  cd $DOWNLOADDIR && \
  curl -JLO http://os.archlinuxarm.org/os/ArchLinuxARM-rpi-aarch64-latest.tar.gz
)

sfdisk --quiet --wipe always $SDDEV << EOF
,256M,0c,
,,,
EOF

mkfs.vfat -F 32 $SDPARTBOOT
mkfs.ext4 -q -E lazy_itable_init=0,lazy_journal_init=0 -F $SDPARTROOT

mkdir -p $SDMOUNT
mount $SDPARTROOT $SDMOUNT
mkdir -p ${SDMOUNT}/boot
mount $SDPARTBOOT ${SDMOUNT}/boot

bsdtar -xpf ${DOWNLOADDIR}/ArchLinuxARM-rpi-aarch64-latest.tar.gz -C $SDMOUNT

sed -i 's/mmcblk0/mmcblk1/' ${SDMOUNT}/etc/fstab
Prepare for headless boot
Note that this is only required if the initial boot to configure the Raspberry Pi is performed headless (i.e. without an attached HDMI display). When replacing the kernel later in this guide, U-Boot will be removed anyway and this issue will be permanently solved.
Replace the Das U-Boot boot loader with the one included with Ubuntu, which has been patched to solve this issue.
Run as root:
mkdir -p ${DOWNLOADDIR}/uboot
pushd ${DOWNLOADDIR}/uboot
curl -JLO http://ports.ubuntu.com/pool/universe/u/u-boot/u-boot-rpi_2020.10+dfsg-1ubuntu0~20.04.2_arm64.deb
ar x *.deb
tar xf data.tar.xz
cp usr/lib/u-boot/rpi_arm64/u-boot.bin ${SDMOUNT}/boot/kernel8.img
popd
There are several options for initially connecting to a headless Pi:
- Over a wired network using SSH. By default, the Rapsberry Pi will request a DHCP address, and the SSH server is enabled. An advantage of SSH is that it can be used for remote shell-based management and file transfer (through SCP and SFTP).
- Over a serial connection using the Pi’s GPIO connector, which exposes an UART device using 0-3.3 volts levels. While this connection method is slow, it can be used to diagnose early boot issues. Be aware that enabling the Pi’s UART port locks the GPU at a speed of 250 MHz. It is recommended to only use this for initial configuration, and to disable it afterwards. Read more about this limitation here, specifically in the ‘Mini UART and CPU core frequency’ section.
- Over a serial connection using the Pi’s USB-C connector, which can be configured to simulate a USB serial adapter. In terms of hardware only an USB-A to USB-C cable is required, and the interface is quite fast. However, it cannot be used to diagnose early boot problems due to that configuration happens quite late in the boot process.
For reference, the pinout for an UART device connection can be found here. The default serial configuration of the GPU, which initializes the boot process, is:
- Baud rate: 115200
- Data bits: 8
- Parity: None
- Stop bits: 1
- Flow control: None
The GPU will only output boot information if BOOT_UART has the value ‘1’ in the EEPROM configuration. Read more information about this from the Raspberry Pi Foundation here. If you want to change this value, read the section ‘Preparing a Raspberry Pi 4B’ in this guide that I wrote about booting a Pi 4 over a network connection, which you can apply after following this guide.
When Linux kernels are configured to output a terminal to the Raspberry Pi’s serial port, they often use the same configuration as the GPU. During boot, when the GPU passes control to Linux on the CPU, there is no need to reconfigure the settings of the serial port that is used to access a Pi’s terminal. The Linux kernel will output information to the UART device independent of whether the GPU does it or not in the earlier stage of the boot process.
For USB over serial, some preparation is necessary to enable a serial interface on the Pi 4 after boot. See Appendix A for this before continuing.
To learn about how to transfer files through either serial connection, see Appendix B.
Remove the SD card safely
Run as root:
sync
umount -R $SDMOUNT
Now remove the microSD card.
Boot the Raspberry Pi
Insert the microSD card in the Raspberry Pi and apply power. Gain access through a serial connection or through a wired network connection using SSH. If a network connection is used, monitor your DHCP server for the correct IP address.
Login
Use the Arch Linux ARM default credentials.
Username: alarm Password: alarm
After login, use su root to gain root access. The password of the root account is ‘root’.
All following commands are executed on the Raspberry Pi as root.
Test and fix wireless network support
Run:
ls /sys/class/net
If ‘wlan0’ is listed, skip this section. If ‘wlan0’ is missing, run:
dmesg | grep "brcmfmac"
The output can be similar to this:
[    6.874361] brcmfmac: brcmf_fw_alloc_request: using brcm/brcmfmac43455-sdio for chip BCM4345/6
[    6.884768] usbcore: registered new interface driver brcmfmac
[    9.609512] brcmfmac: brcmf_sdio_bus_rxctl: resumed on timeout
[   16.608713] brcmfmac: brcmf_sdio_firmware_callback: brcmf_attach failed
This is a timeout issue that sometimes happens during boot with the generic aarch64 kernel. It can often be fixed with a reboot, or by running:
rmmod brcmfmac && modprobe brcmfmac
Now run ls /sys/class/net again, and ‘wlan0’ should be listed.
This issue will not occur anymore when later in this guide, the generic aarch64 kernel is replaced with a kernel specifically compiled for the Raspberry Pi 4.
Update Arch Linux ARM
An internet connection is required. Run wifi-menu first if a wireless connection is necessary.
To update Arch Linux ARM for the first time, run:
pacman-key --init
pacman-key --populate archlinuxarm
pacman -Syu --noconfirm
Do not reboot yet. There is a new kernel to be installed, and some configuration to be made.
Install the Pi 4 specific kernel
Run:
dmesg|grep "xhci_hcd"
USB will not work if the output looks like this.
[    6.547972] xhci_hcd 0000:01:00.0: xHCI Host Controller
[    6.560878] xhci_hcd 0000:01:00.0: new USB bus registered, assigned bus number 1
[   16.570916] xhci_hcd 0000:01:00.0: can't setup: -110
[   16.575995] xhci_hcd 0000:01:00.0: USB bus 1 deregistered
[   16.581796] xhci_hcd 0000:01:00.0: init 0000:01:00.0 fail, -110
[   16.587857] xhci_hcd: probe of 0000:01:00.0 failed with error -110
This issue and the issue of the wireless network driver sometimes not working can be fixed by switching to a kernel specifically compiled for the Raspberry Pi 4, which is based on the kernel configuration by the Raspberry Pi Foundation. As a small ‘bonus’, Das U-Boot will be removed, since it is not necessary with a Pi-specific kernel. This makes the boot process simpler and a bit faster.
First ensure that you have an internet connection on the Pi (ip addr and ping are your friends). Then run:
pacman -R --noconfirm linux-aarch64 uboot-raspberrypi
pacman -S --noconfirm linux-raspberrypi4

sed -i 's/mmcblk1/mmcblk0/' /etc/fstab
If you use a USB to UART adapter and the Pi’s UART device on the GPIO port to interact with the Pi, enable serial console support with the new kernel by running:
echo "enable_uart=1" >> /boot/config.txt
sed -Ei 's/(console=)ttyAMA0/\1ttyS0/' /boot/cmdline.txt
sed -Ei 's/\s*kgdboc=ttyAMA0,115200//' /boot/cmdline.txt
This is required since with the Pi Foundation kernel and the latest Raspberry Pi firmware boot files, the serial console is assigned to the mini UART interface of the SoC and not the ‘first PL011 (UART0)’ interface. More background information about Raspberry Pi serial ports can be found here. The last command also disables kernel debug over serial support on the serial port to which the Bluetooth radio is connected, since it is unnecessary and might intervene with Bluetooth support of the Pi.
If you use a serial console over USB using the Pi 4’s USB-C connector, run:
echo "dtoverlay=dwc2,dr_mode=peripheral" >> /boot/config.txt
This is required due to that config.txt is overwritten at boot, which will remove this line if it was added previously.
Now reboot. After login, run:
dmesg|grep "xhci_hcd"
The output should now be similar to:
[    2.946126] xhci_hcd 0000:01:00.0: xHCI Host Controller
[    2.946167] xhci_hcd 0000:01:00.0: new USB bus registered, assigned bus number 1
[    2.946718] xhci_hcd 0000:01:00.0: hcc params 0x002841eb hci version 0x100 quirks 0x0000030000000890
[    2.948946] xhci_hcd 0000:01:00.0: xHCI Host Controller
[    2.948974] xhci_hcd 0000:01:00.0: new USB bus registered, assigned bus number 2
[    2.949002] xhci_hcd 0000:01:00.0: Host supports USB 3.0 SuperSpeed
[    4.703306] usb 1-1: new high-speed USB device number 2 using xhci_hcd
This indicates that the USB-A ports are working.
Concluding remarks
The default Das U-Boot boot loader and the included generic aarch64 kernel of Arch Linux ARM have multiple little quirks with the Pi 4 with 8 GB of RAM. Combined, these quirks are quite annoying: a Pi will not boot without a connected HDMI monitor, the USB-A ports are not working, and sometimes the wireless network card fails to initiate.
Removing Das U-Boot from the boot process and replacing the generic kernel with one specifically compiled for the Raspberry Pi 4 solves these issues. Ideally, an Arch Linux ARM aarch64 image for the Raspberry Pi 4 should incorporate these changes. Since such an image does not exist and these issues are not solved yet in the generic Pi aarch64 image, the fixes described in this guide can be used instead.
Appendix A: Pi 4 serial console over USB
A serial port can be used to manage the Pi through an offered terminal, and to transfer files. If a USB to UART adapter is unavailable to connect to the Pi’s GPIO connector, the Pi 4 (or a Pi Zero) can offer a serial port over USB. For doing so, keep reading. For transferring files over a serial connection (which also works with a USB UART adapter), read Appendix B.
Before unmounting an removing the SD card from your computer during preparation, run the following commands as root. Again, make sure that the variables on top are correct for your configuration.
export SDDEV=/dev/mmcblk0
export SDPARTBOOT=/dev/mmcblk0p1
export SDPARTROOT=/dev/mmcblk0p2
export SDMOUNT=/mnt/sd
export DOWNLOADDIR=/tmp/pi

echo "dtoverlay=dwc2,dr_mode=peripheral" >> ${SDMOUNT}/boot/config.txt

mkdir -p ${SDMOUNT}/opt/usb-gadget/
cat << 'EOF' > ${SDMOUNT}/opt/usb-gadget/serial.sh
#!/usr/bin/env bash
set -euo pipefail

GADGET_NAME=raspberrypi
LANGUAGE=0x409 # English
MANUFACTURER="Raspberry Pi Foundation"
PRODUCT="Raspberry Pi"

if [[ $EUID -ne 0 ]]; then
   echo "This script must be run as root"
   exit 1
fi

echo "Loading libcomposite"
CONFIGFS=/sys/kernel/config/usb_gadget
modprobe dwc2
modprobe libcomposite
while [ ! -d $CONFIGFS ]
do
  sleep 0.1
done

echo "Cleaning up existing gadget"
GADGET=$CONFIGFS/$GADGET_NAME
echo "Stopping getty"
systemctl stop getty@ttyGS0.service
echo "Removing config-level functions"
find $GADGET/configs/*/* -maxdepth 0 -type l -exec rm {} \; || true
echo "Removing config-level strings"
find $GADGET/configs/*/strings/* -maxdepth 0 -type d -exec rmdir {} \; || true
echo "Removing config-level OS descriptors"
find $GADGET/os_desc/* -maxdepth 0 -type l -exec rm {} \; || true
echo "Removing gadget-level functions"
find $GADGET/functions/* -maxdepth 0 -type d -exec rmdir {} \; || true
echo "Removing gadget-level strings"
find $GADGET/strings/* -maxdepth 0 -type d -exec rmdir {} \; || true
echo "Removing gadget-level configs"
find $GADGET/configs/* -maxdepth 0 -type d -exec rmdir {} \; || true
echo "Removing gadget"
rmdir $GADGET || true
echo "Starting getty"
systemctl start getty@ttyGS0.service

echo "Creating gadget"
mkdir $GADGET
cd $GADGET

echo "Configuring device identifiers"
echo 0x1d6b > idVendor  # Linux Foundation
echo 0x0104 > idProduct # Multifunction Composite Gadget
echo 0x0100 > bcdDevice # v1.0.0
echo 0x0200 > bcdUSB    # USB 2.0
mkdir strings/$LANGUAGE
echo $MANUFACTURER > strings/$LANGUAGE/manufacturer
echo $PRODUCT      > strings/$LANGUAGE/product

echo "Configuring gadget as composite device"
# https://msdn.microsoft.com/en-us/library/windows/hardware/ff540054(v=vs.85).aspx
echo 0xEF > bDeviceClass
echo 0x02 > bDeviceSubClass
echo 0x01 > bDeviceProtocol

echo "Configuring OS descriptors"
# https://msdn.microsoft.com/en-us/library/hh881271.aspx
echo 1       > os_desc/use
echo 0xcd    > os_desc/b_vendor_code
echo MSFT100 > os_desc/qw_sign

echo "Creating serial function"
mkdir functions/acm.usb0

echo "Creating gadget configuration"
mkdir configs/c.1
echo 500 > configs/c.1/MaxPower
mkdir configs/c.1/strings/$LANGUAGE
echo "Config 1" > configs/c.1/strings/$LANGUAGE/configuration
ln -s functions/acm.usb0 configs/c.1
ln -s configs/c.1 os_desc/c.1

echo "Attaching gadget"
udevadm settle -t 5 || true
ls /sys/class/udc/ > UDC

echo "Done!"
EOF
chmod +x ${SDMOUNT}/opt/usb-gadget/serial.sh

cat << 'EOF' > ${SDMOUNT}/etc/systemd/system/usb-gadget-serial.service
[Unit]
Description=Enable USB gadget serial terminal device

[Service]
Type=oneshot
ExecStart=/opt/usb-gadget/serial.sh

[Install]
WantedBy=multi-user.target
EOF

ln -s /etc/systemd/system/usb-gadget-serial.service \
  ${SDMOUNT}/etc/systemd/system/multi-user.target.wants/usb-gadget-serial.service
The script starts with configuring the Pi’s firmware to set the USB-C port to be used as a ‘peripheral’ device, which allows the Pi to offer different kinds of USB devices to a host. Then, two files are written to the SD card. The first is a full script that makes the Pi offer a serial port over USB on a USB-C (Pi 4) or micro-USB (Pi Zero) port. The second is a small systemd service file that can be used to execute the script. Finally, a seamless link is made, which indicates to the Pi that the systemd service should be started on boot. It is the manual equivalent of running systemctl enable usb-gadget-serial.service on the Pi.
Connect the Pi to your computer using a USB cable to power it. After it boots up, a new serial device will be offered (in Linux: /dev/ttyACM0, in Windows: a new COM port). Use a terminal emulator (e.g. Minicom in Linux, or PuTTY in Windows).
Appendix B: Serial file transfer
Transferring files over serial connections is not often done these days, except maybe for embedded applications. However, it can still be useful to master this skill. One good use case is exchanging files with a Pi without an available network connection, and without using USB.
If you use an Arch Linux-flavored Linux distribution on both sides of the serial connection, execute all the following commands on both sides. Otherwise, use a terminal emulator that has ZMODEM or Kermit support, and execute these commands only on the Pi.
Run as root:
pacman -S --noconfirm lrzsz ckermit
ln -s /usr/bin/ckermit /usr/local/bin/kermit
If files are to be transferred using the Kermit protocol and C-Kermit is used, also run on the device initiating the transfer:
echo "SET CARRIER-WATCH OFF" >> ~/.kermrc
This will prevent C-Kermit from waiting for a carrier signal that will never be received on a simple null modem line.
To send a file from the host computer to the Pi, use the file send function of your favorite terminal emulator after login. In Minicom, press CTRL+A, S (that is, hold CTRL, hold A, release both, push S) to open the send dialog. The most reliable protocols are ZMODEM and Kermit, which will automatically start the equivalent program to receive the file on the Pi’s side when initiated. Expect transfer speeds of ~10 KB/sec over UART, and 8-15 MB/sec over USB.
To transfer a file from the Pi back to the host computer, run one of the following commands on the Raspberry Pi:
# ZMODEM (initiates file transfer automatically in Minicom)
sz -b <file>

# Kermit (requires manual Kermit activation in Minicom using CTRL+A, R)
kermit -i -s <file>
Some examples of a (large) file transfer to a Raspberry Pi using Kermit follow.
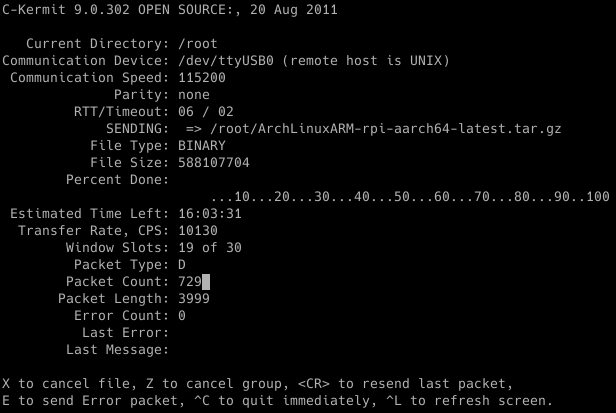
Using a UART device on the Pi’s GPIO connector (limited to 115,200 bits per second):
Using a USB serial connection on the Pi’s USB-C connector (which ignores the serial communication speed limit):
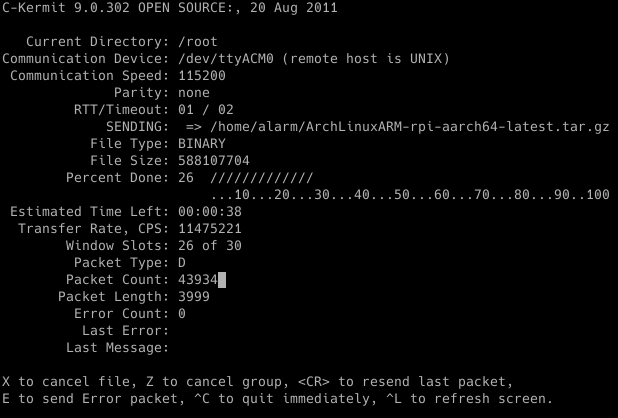
The USB connection is slightly faster. The difference is a factor of ~1,333. Note that the Kermit transmission is not optimized in these examples. Various options exist to push the transfer rate further. Those are definitely outside of the scope of this guide, and likely belong in a museum.