
Arch Linux ARM network boot on Raspberry Pi 4
Foreword
In this post I explain the ins and outs of network booting a Raspberry Pi 4 Model B (Pi 4B). I did this earlier for older Raspberry Pi models. The new boot procedure of the Pi 4B is unlike its predecessors, and this warrants a new post. The new boot process will be explained, and a configuration will be offered that will allow network booting of both older and newer Raspberry Pis in a single network.
What is written here is based on this page from the Raspberry Pi Foundation and on my own findings. Some parts were taken from my previous post concerning network booting older Raspberry Pi models. This post does contain an up-to-date DHCP server configuration which can also be used to boot older Pi models in addition to the Pi 4B.
About Raspberry Pi 4 network boot
It is possible to network boot a Raspberry Pi 4 Model B (Pi 4B) without an SD card. However, some preparation of the Pi 4B might be necessary, depending on its age.
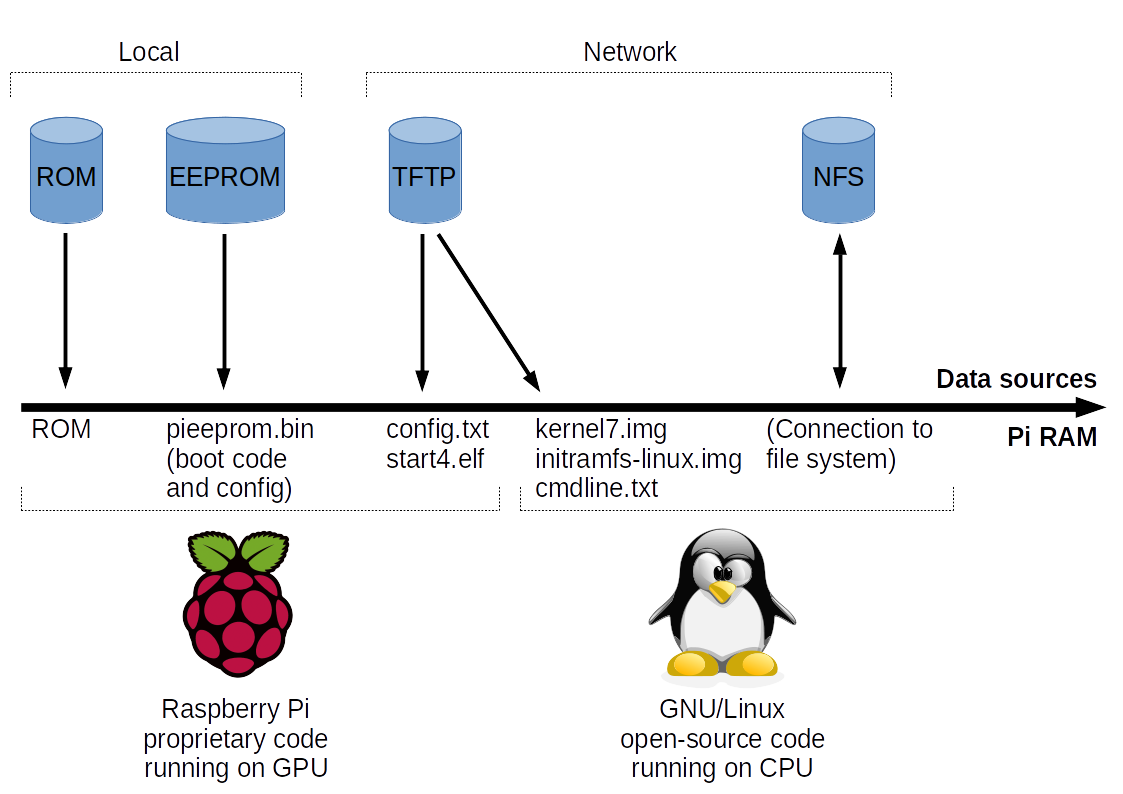
A typical Raspberry Pi 4 network boot is shown in the above figure. A few liberties were taken to simplify the drawing. Some non-critical boot files are not mentioned, such as fixup4.dat (used for shared memory management between the GPU and CPU).
As noted in the older article, a Pi’s boot process always starts with the graphical processing unit (GPU) running proprietary code from ROM. This is also true for the Pi 4B. It is after executing the code in ROM that the new boot process differs. The system on chip (SoC) of the Pi 4B is the BCM2711B0, which contains an embedded EEPROM. The EEPROM contains 512 KiB of boot code that is executed after the ROM code is executed. This boot code consists of two parts:
- A proprietary binary blob, similar to bootcode.bin for the older Raspberry Pi models. Note that the Pi 4B does not use bootcode.bin.
- The early boot configuration (bootconf.txt).
The purpose of the EEPROM boot code is to load and execute the next boot stage contained in start4.elf. All current Pi 4B computers were shipped with EEPROM boot code that can only load the necessary files from an SD card. Fortunately, the EEPROM can be reprogrammed with newer boot code released by the Raspberry Pi Foundation. A beta version of the EEPROM boot code was released on 23 September 2019 which allows a Pi 4B to load the necesary files either from an SD card or from a TFTP server using the embedded Ethernet controller. Newer versions have been released since then that fix bugs. Check out this page for the last beta version.
When booting from network, all necessary network configuration parameters can either be provided through DHCP (as with previous Pi models) or in the early boot configuration contained in the EEPROM. While connecting to the TFTP server, the Pi 4B will first attempt to get start4.elf from a directory based on the Pi’s serial number, the embedded Ethernet controller’s MAC address or a custom value, depending on the configuration in bootconf.txt contained in the EEPROM. If the TFTP server reports that start4.elf exists in this directory, all other boot files will also be loaded from the same directory. This function allows each Pi in the same network to have its own boot files. If it fails to detect start4.elf in its own directory, the Pi will attempt to get the boot files from the root directory of the TFTP server instead.
The first file that is actually downloaded is config.txt. This file determines which boot files will be downloaded next, and can freely be configured by the Linux distribution or the user. This file only determines which files are loaded, not from where they are retrieved. Their location has already been determined earlier.
After parsing config.txt, commonly start4.elf and other related boot files are downloaded and executed. Some specific exceptions exist. For example, if config.txt states that the GPU should only use 16 MB of memory then start4cd.elf will be loaded instead. This alternative boot file disables some GPU features that can only function when more memory is available. It’s not necessary to think too much about which specific files will be loaded. Pi-prepared operating systems will contain all necessary files in a single directory. The Pi will take from this directory whatever it needs.
The most important data that start4.elf (or one of the alternatives) loads into memory are a kernel, an initial ramdisk and the kernel parameters. After all these files are loaded, the GPU enables the CPU with the kernel as the starting execution point. From this point on the boot process is handled further by third-party code on the CPU, such as Linux.
The operating system does not know by itself that the system was booted using network boot. Only the kernel, the initial ramdisk and the kernel parameters are loaded in memory. These must be prepared in such a way that they can access the root file system over the network to fully boot the operating system.
There are different network protocols for remotely providing a file system, and potentially all are usable for network booting.
Some provide a remote block device to write data to and read data from, such as NBD and iSCSI. On top of these it is possible to let the client use any file system. The server only sees and handles raw binary data.
There are also protocols that offer their own file system, such as NFS and SMB. Where NBD and iSCSI let the client manage the filesystem stored on the server’s disk as a block device, NFS and SMB let the server deal with this. This means that the files of the Raspberry Pi will be hosted on a disk file system managed by the server. The Raspberry Pi is unaware of the on-disk file system.
For this guide NFS is used. It is a protocol that is easy to configure and use, and does not require disk space on the server to be reserved for a block device. Only disk space actually needed by the Pi will be used.
Prerequisites
An Arch Linux or Arch Linux ARM server, to provide a DHCP server and to host Raspberry Pi file systems through TFTP and NFS. Earlier I wrote a post that offers a quick start guide to installing Arch Linux that might be useful.
A Raspberry Pi 4 Model B
A microSD card. The microSD card is needed to update the EEPROM of the Pi 4B, and to prepare a network bootable Arch Linux ARM distribution before it is copied to the server. It can be reused lated to update the EEPROM’s of other Pi 4Bs.
Server configuration
This section assumes you use an Arch Linux (ARM) server that will serve DHCP, TFTP and NFS on a separate network interface only connected to Raspberry Pi clients. For this post, the server’s IP adress on this separate network is 192.168.47.1.
It is recommended to first use the information in this section to create a clean test environment, containing remotely booting Pis and the server on a separate network. After everything works as intended, the DHCP, TFTP and NFS services and settings can be integrated in an existing network infrastructure.
Prepare storage
For this configuration it is assumed that the server will host all files. Some preparation of the file system is needed to make the configuration easier and manageable.
Run:
mkdir -p /opt/piserver/root

mkdir -p /srv/tftp/pi
mount --bind /opt/piserver/root /srv/tftp/pi
echo "/opt/piserver/root /srv/tftp/pi  none   bind   0   0" >> /etc/fstab

mkdir -p /srv/nfs/pi
mount --bind /opt/piserver/root /srv/nfs/pi
echo "/opt/piserver/root /srv/nfs/pi  none   bind   0   0" >> /etc/fstab
With this configuration, the TFTP server configuration points to /srv/tftp and the NFS server points to /srv/nfs. This makes reconfiguration easier if data ever has to be moved. Simply adjust /etc/fstab after a data migration and reboot. There is no need to go into individual server configuration files.
/opt/piserver/root will contain a subdirectory with a full file system for each Raspberry Pi. The name of each subdirectory will be the Pi’s serial number.
Install and configure TFTP
TFTP is used for the first network boot stage. The Pi’s binary blobs, boot configuration parameters, the Linux kernel and the initial ramdisk are transferred through TFTP when booting.
Start by installing TFTP server software:
pacman -S tftp-hpa
Configure the TFTP server:
echo 'TFTPD_ARGS="--map-file /etc/tftpd.mapfile \
--address 192.168.47.1 --secure /srv/tftp/"' > /etc/conf.d/tftpd
Create a TFTP server mapping file /etc/tftpd.mapfile with the following content:
# Deny all uploads
Pa .*

# Allow download of bootcode.bin, and redirect the request to the Pi subdirectory
Gre ^bootcode\.bin$ pi/bootcode\.bin

# Only allow download of files
# - Starting with a single directory path, containing
#   - 8 lower case hex characters
# - Optionally from the "overlays" subdirectory
# - With a file name that must
#   - contain characters that are (and/or)
#     - alphanumeric (case insensitive)
#     - underscore (_)
#     - dash (-)
#   - optionally (XOR)
#     - Have a file extension as part of the file name
#     - Is a hidden file
Ga~ ^[0-9a-f]{8}/(overlays/)?[0-9A-Za-z_\-]*\.?[0-9A-Za-z_\-]+$

# Rewrite the request
# - Add 'pi/' to the beginning of the request
# - Add 'boot/' after the first directory name (Pi serial number) of the request
Gre ^([0-9a-f]{8}/)(.+)$ pi/\1boot/\2
Start the TFTP server:
systemctl enable tftpd
systemctl start tftpd
Install and configure NFS
Start by installing NFS server and client support software:
pacman -S nfs-utils
Configure the NFS server to only listen on the relevant network interface:
echo "[nfsd]" >> /etc/nfs.conf
echo "host=192.168.47.1" >> /etc/nfs.conf
Create an NFS share:
echo "/srv/nfs 192.168.47.0/24(crossmnt,rw,fsid=0,no_root_squash,no_subtree_check)" >> /etc/exports
Enable and start the NFS server, and see the available NFS share:
systemctl enable nfs-server
systemctl start nfs-server
exportfs -v
Install and configure an NTP server
A stock Raspberry Pi does not have a battery to store the current time whenever it is offline. Without going into details, it is safe to say that unsynchronized clocks between computers cause a range of unwanted problems.
Strictly speaking, a self-hosted NTP server is not necessary. Raspberry Pis can synchronize their time using servers on the Internet. However, it is assumed that the Raspberry Pis will run in an isolated test environment, and that can mean that there is no direct internet connection. Therefore the server also has to provide NTP services.
Install NTP server software:
pacman -S ntp
Configure the NTP server software to only listen and serve time synchronization requests on the relevant network interface:
echo "" >> /etc/ntp.conf
echo "interface ignore wildcard" >> /etc/ntp.conf
echo "interface listen 192.168.47.1" >> /etc/ntp.conf
echo "restrict 192.168.47.0 255.255.255.0" >> /etc/ntp.conf
Enable and start the NTP server:
systemctl enable ntpd
systemctl start ntpd
Install and configure DHCP
DHCP is the protocol that provides a booting Raspberry Pi both an IP address and part of its boot configuration.
Many tutorials on the Internet will refer to dnsmasq, which integrates a DHCP server, DNS server, a TFTP server and other services. While fine for small deployments, it lacks detailed low-level network configuration by abstracting away common configuration values. To better explain the boot process, I will be using the Internet Systems Consortium DHCP Server, which provides an open-source de-facto reference standard for DHCP.
Install the DHCP server:
pacman -S dhcp
Replace the contents of the default /etc/dhcpd.conf with:
log-facility local7;

authoritative;
default-lease-time 86400;
max-lease-time 86400;

option local-rootpath     code 17 = text;                # Server - RFC 2132, 3.19
option local-vendorinfo   code 43 = text;                # Server - RFC 2132, 8.4
option local-parmreqlist  code 55 = string;              # Client - RFC 2132  9.8
option local-vendorid     code 60 = text;                # Client - RFC 2132, 9.13
option local-servername   code 66 = ip-address;          # Server - RFC 2132, 9.4
option local-piservername code 66 = text;
option local-bootfile     code 67 = text;                # Server - RFC 2132, 9.5
option local-architecture code 93 = unsigned integer 16; # Client - RFC 4578, 2.1
option local-netinfid     code 94 = string;              # Client - RFC 4578, 2.2
option local-machineid    code 97 = string;              # Client - RFC 4578, 2.3

# Identifies Raspberry Pis and offers them additional
# DHCP options required for network boot. Optionally,
# specific Pis are chosen for network booting based
# on MAC address (24 bit unique value) or Pi serial
# number (32 bit unique value).
# Note that identification by Pi serial number only
# works with Raspberry Pi model 3B+ or with an
# updated bootcode.bin on older Pi models.
class "raspberrypi" {
  match if (
    (
          # Parameter list from Pi 3B ROM and old bootcode.bin
          binary-to-ascii(10,8,",",option local-parmreqlist) =
            "43,60,67,128,129,130,131,132,133,134,135,66"
          # Parameter list from Pi 3B+ ROM and newer bootcode.bin
       or binary-to-ascii(10,8,",",option local-parmreqlist) =
            "43,60,67,128,129,130,131,132,133,134,135,66,1,3"
          # Parameter list from Pi 4B EEPROM boot code (2019-10-16)
       or binary-to-ascii(10,8,",",option local-parmreqlist) =
            "1,3,43,60,66,67,128,129,130,131,132,133,134,135"
    )
    and option local-vendorid =
      "PXEClient:Arch:00000:UNDI:002001"
    and option local-architecture =
      00:00    # Architecture: Intel x86PC
    and option local-netinfid =
      01:02:01 # Network Interface ID: UNDI 2.1
    and substring(option local-machineid,0,1) =
      00       # Machine identifier type: GUID
    and substring(hardware,0,1) =
      01       # Interface type: Ethernet
    and (
         substring(hardware,1,3) =
           b8:27:eb # Pi Foundation OUI listing
      or substring(hardware,1,3) =
           dc:a6:32 # Raspberry Pi Trading Ltd OUI listing
    )
#  ) and (
#    (
#          # MAC address identification
#          # Pi 1B+, Pi 2B, Pi 3B, Pi 3B+ (derived from serial number)
#          substring(hardware,1,6) = b8:27:eb:BB:CC:D1
#       or substring(hardware,1,6) = b8:27:eb:BB:CC:D2
#          # Pi 4B (programmed at manufacture)
#       or substring(hardware,1,6) = dc:a6:32:FE:DC:B1
#    )
#  ) and (
#    (
#          # Pi serial identification
#          reverse(1,suffix(option local-machineid,4)) = AA:BB:CC:D1
#       or reverse(1,suffix(option local-machineid,4)) = AA:BB:CC:D2
#    )
  );

  option local-vendorinfo "Raspberry Pi Boot   ";
  option local-piservername "192.168.47.1";
}

group {
  subnet 192.168.47.0 netmask 255.255.255.0 {
    pool {
      range 192.168.47.128 192.168.47.254;
      option subnet-mask 255.255.255.0;
      #option routers 192.168.47.1;
      #option domain-name-servers 192.168.47.1;
    }
  }
}
Some background information about this configuration file can be found in Appendix A.
Enable and start the DHCP server:
systemctl enable dhcpd4
systemctl start dhcpd4
The server is now configured. All it needs is a copy of the operating system that the Raspberry Pis need to run.
Pi Arch Linux ARM preparation
The easiest way to prepare both a Pi 4B and the operating system is to install Arch Linux ARM on an SD card. This installation will be used for two purposes:
- Updating the Pi 4B’s EEPROM (must be done once for each Pi 4B).
- Modify Arch Linux ARM to make a network bootable operating system (must be done once, can be used for multiple Pis).
Preparing a Raspberry Pi 4B
Prepare an SD card with Arch Linux ARM. Boot the Raspberry Pi 4B with it.
First check the version of the current boot code in EEPROM:
/opt/vc/bin/vcgencmd bootloader_version
If it has a date of 10 September 2019 or earlier, the boot code does not support network booting. Follow the rest of this section to update the boot code. If the boot code is newer, this section can be skipped.
Install prerequisites (as root):
pacman -Syu --needed git python3 binutils

git clone https://github.com/raspberrypi/rpi-eeprom.git /opt/rpi-eeprom
mkdir -p /lib/firmware/raspberrypi
ln -s /opt/rpi-eeprom/firmware/ /lib/firmware/raspberrypi/bootloader
Save the following as /root/prepflash.sh:
#!/usr/bin/env bash

VC_UTIL_PATH=/opt/vc/bin
EEPROM_UTIL_PATH=/opt/rpi-eeprom
EEPROM_CONFIG_UTIL=$EEPROM_UTIL_PATH/rpi-eeprom-config
EEPROM_UPDATE_UTIL=$EEPROM_UTIL_PATH/rpi-eeprom-update

# Use the latest EEPROM
EEPROM_PATH=/lib/firmware/raspberrypi/bootloader/beta
unset EEPROM_FILE
for file in $EEPROM_PATH/pieeprom-*; do
  EEPROM_FILE=$file
done

TEMP_BOOTCONF=/tmp/bootconf.txt
TEMP_EEPROM=/tmp/pieeprom.bin

# Serial output
# 0 = off (default), 1 = on
# Useful for debugging early boot issues
BOOT_UART=0

# Boot attempt order, from LSB (right) to MSB (left)
# 1 = SD card, 2 = network boot, 4 = USB mass storage device
# Value 0x21 (SD card first) is the same as Pi 1B+, Pi 2B, Pi 3B, Pi 3B+
# Value 0xf41 is the default for newer Pi 4 EEPROM versions
# Value 0xf241 allows network boot if local boot methods fail
BOOT_ORDER=0xf241

# Network boot TFTP directory prefix
# 0 = serial number (same as Pi 1B+, Pi 2B, Pi 3B, Pi 3B+)
# 1 = value of $TFTP_PREFIX_STR
# 2 = MAC address, dash (-) separated, lower case
TFTP_PREFIX=0
TFTP_PREFIX_STR=

$EEPROM_CONFIG_UTIL $EEPROM_FILE > $TEMP_BOOTCONF

sed -i -E "s/^(BOOT_UART=).*$/\1$BOOT_UART/" $TEMP_BOOTCONF
sed -i -E "s/^(BOOT_ORDER=).*$/\1$BOOT_ORDER/" $TEMP_BOOTCONF
sed -i -E "s/^(\[none\])$/TFTP_PREFIX=$TFTP_PREFIX\n\1/" $TEMP_BOOTCONF
sed -i -E "s/^(\[none\])$/TFTP_PREFIX_STR=$TFTP_PREFIX_STR\n\1/" $TEMP_BOOTCONF

$EEPROM_CONFIG_UTIL --out $TEMP_EEPROM --config $TEMP_BOOTCONF $EEPROM_FILE

PATH=$PATH:$VC_UTIL_PATH:$EEPROM_UTIL_PATH $EEPROM_UPDATE_UTIL -d -f $TEMP_EEPROM
Now run the script:
chmod +x /root/prepflash.sh
/root/prepflash.sh
Several files are placed in /boot: pieeprom.sig, pieeprom.upd and recovery.bin. These will be used by the GPU on the next boot to update the EEPROM. All that is left now is to reboot the Pi gracefully:
reboot
After the reboot, run:
/opt/vc/bin/vcgencmd bootloader_version
The boot code should have been updated. If it was, the system is now ready for network boot. To further verify this, the current early boot configuration can be read using:
/opt/vc/bin/vcgencmd bootloader_config
An additional verification is the existence of /boot/RECOVERY.000, which is what the SoC will rename recovery.bin to if the EEPROM update was successful:
ls -al /boot/RECOVERY.000
It is also possible to backup the prepared EEPROM update files (/boot/pieeprom.sig, /boot/pieeprom.upd, /boot/recovery.bin) before the reboot that applies them to make updating other Pi 4Bs easier in the future. Simply place the three files in the root of a FAT32 formatted micro-SD card and power up the Pi 4B with it once. Wait for the green LED to flash quickly and power it off again. The update was successful if recovery.bin was renamed to RECOVERY.000.
For reference, a full bootconf.txt example file, based on the default values (which does not support network boot!) for EEPROM update 2020-09-03:
[all]
BOOT_UART=0
WAKE_ON_GPIO=1
POWER_OFF_ON_HALT=0
BOOT_ORDER=0xf41
MAX_RESTARTS=-1
SD_BOOT_MAX_RETRIES=0
NET_BOOT_MAX_RETRIES=0
DHCP_TIMEOUT=45000
DHCP_REQ_TIMEOUT=4000
TFTP_FILE_TIMEOUT=30000
TFTP_IP=
TFTP_PREFIX=0
TFTP_PREFIX_STR=
PXE_OPTION43=Raspberry Pi Boot
DHCP_OPTION97=0x34695052
CLIENT_IP=
SUBNET=
GATEWAY=
MAC_ADDRESS=
DISABLE_HDMI=0
HDMI_DELAY=5
ENABLE_SELF_UPDATE=1
FREEZE_VERSION=0
NETCONSOLE=
USB_MSD_EXCLUDE_VID_PID=
USB_MSD_DISCOVER_TIMEOUT=20000
USB_MSD_LUN_TIMEOUT=2000
USB_MSD_PWR_OFF_TIME=1000
XHCI_DEBUG=0x0
As noted in /root/prepflash.sh, set BOOT_ORDER=0xf241 to enable network boot when boot is impossible from SD or USB.
See these pages from the Raspberry Pi Foundation for more information.
Prepare Arch Linux ARM for network boot
If an Arch Linux ARM installation on SD card was prepared to update the Pi 4B’s EEPROM then it can be used. If not, prepare an SD card with Arch Linux ARM. Boot the Pi 4B with it.
This section assumes that the official instructions were followed and that the user alarm (default password: alarm) is logged in, either locally or through SSH.
For preparation of the operating system an internet connection is required. In this step there is no interaction between the server and the Pi. Therefore, the Pi does not have to be connected to the test network. Connect it to a network that has an internet connection instead.
Update the operating system and install required packages
This is quite straightforward:
su root # Password is 'root' by default
pacman-key --init
pacman-key --populate archlinuxarm
wifi-menu # Only if a wireless network is needed to get internet access
pacman -Syu --needed nfs-utils mkinitcpio-nfs-utils
Like Arch Linux, Arch Linux ARM has a rolling release cycle. Partial upgrades are not supported. To install new software it is also required to upgrade the current software. This is all done in the last command.
Add NFSv4 root file system support:
Arch Linux (ARM) only supports NFSv3 for mounting the root file system. With some commands NSFv3 support can easily be replaced with support for NSFv4:
sed 's/nfsmount/mount.nfs4/' "/usr/lib/initcpio/hooks/net" \
  > "/usr/lib/initcpio/hooks/netnfs4"
cp /usr/lib/initcpio/install/net{,nfs4}
Now add NFSv4 root file system support to the initial ramdisk:
sed -i '/^MODULES=/ s/)$/ nfs)/' /etc/mkinitcpio.conf
sed -i '/^BINARIES=/ s/)$/ \/usr\/bin\/mount.nfs4)/' /etc/mkinitcpio.conf
sed -i '/^HOOKS=/ s/)$/ netnfs4)/' /etc/mkinitcpio.conf
sed -i -E 's/^(HOOKS=.*) fsck(.*)$/\1\2/' /etc/mkinitcpio.conf
mkinitcpio -p linux-raspberrypi4
Now add NTP client synchronization support:
echo "NTP=192.168.47.1" >> /etc/systemd/timesyncd.conf
timedatectl set-ntp true
The IP address of the NTP server has to be configured manually since requesting and using an address provided by DHCP would drop the network connection to the system’s root file system.
Workaround for the Pi 4B’s wireless adapter, which must be reset after boot since the required firmware files are not available during boot:
echo '#!/usr/bin/env bash' > /opt/wireless-reset.sh
echo "rmmod brcmfmac && modprobe brcmfmac" >> /opt/wireless-reset.sh
chmod +x /opt/wireless-reset.sh

cat << 'EOF' > /etc/systemd/system/wireless-reset.service
[unit]
Description=Resets the wireless network driver

[Service]
Type=oneshot
ExecStart=/opt/wireless-reset.sh

[Install]
WantedBy=multi-user.target
EOF

systemctl enable wireless-reset
Before wrapping everything up, get the serial number of the Raspberry Pi:
cat /proc/cpuinfo | grep "^Serial" | tail -c 9
The serial number of a Raspberry Pi is a 32 bit value encoded as a lower case hex string of four bytes. This value is used during the boot process by a Pi to distinguish it from other Pis.
Turn off the Rasberry Pi cleanly:
shutdown now
Power down the Raspberry Pi and remove the SD card.
Prepare a network bootable distribution
With the data on the SD card and some small modifications it is now possible to make an NFS bootable Arch Linux ARM distribution on the server.
Copy the SD card content to the server
Connect the SD card with the server and run these commands:
pacman -S --needed rsync
mount /dev/mmcblk0p2 /mnt
mount /dev/mmcblk0p1 /mnt/boot
rsync -aAXq --exclude={"/dev/*","/proc/*","/sys/*","/tmp/*","/run/*","/mnt/*","/lost+found"} \
  /mnt/ /opt/piserver/base/
Alternatively, the contents of the SD card can be uploaded to the server using rsync and SSH. First install rsync on the server using the first command from the previous set of commands. After that, enable SSH login by root by adding the following line to /etc/ssh/sshd_config on the server:
PermitRootLogin yes
Reload the OpenSSH server configuration:
systemctl reload sshd
Now it is possible to copy the files from the client to the server by running something like this on the client:
mount /dev/mmcblk0p2 /mnt
mount /dev/mmcblk0p1 /mnt/boot
rsync -aAXq --exclude={"/dev/*","/proc/*","/sys/*","/tmp/*","/run/*","/mnt/*","/lost+found"} \
  -e ssh /mnt/ root@192.168.47.1:/opt/piserver/base/
Replace 192.168.47.1 with the IP address of the server. If you get the error ‘bash: rsync: command not found’, ensure that rsync is also installed on the server.
In both copy actions above (directly on the server or through a client) partitions of /dev/mmcblk0 are used to mount the SD card. This assumes that a ‘direct’ SD card reader is used. If a USB connected SD card reader is used, check the output of dmesg and replace the device names accordingly. Expect partition device node names such as /dev/sdb2 and /dev/sdb1, to be mounted respectively at /mnt and /mnt/boot.
Reconfigure the distribution to boot from NFS
Adjust the boot parameters by editing /opt/piserver/base/boot/cmdline.txt and replacing its content with:
ip=:::::eth0:dhcp nfsroot=192.168.47.1:/pi/<serial>/ rw rootwait console=ttyS0,115200 console=tty1 selinux=0 plymouth.enable=0 smsc95xx.turbo_mode=N dwc_otg.lpm_enable=0 elevator=noop
Leave <serial> as it is written. After a copy is made of the base directory, this needs to be changed to the serial number of the Raspberry Pi.
Disable the systemd-networkd configuration of the wired network interface:
mv /opt/piserver/base/etc/systemd/network/eth0.network{,.disabled}
If the configuration would be enabled, the system would lose connection with its network file system when systemd-networkd would drop the current IP configuration.
Disable mounting of a separate boot partition:
sed -i '/^\/dev\/mmcblk0p1/d' /opt/piserver/base/etc/fstab
A Raspberry Pi SD card commonly contains two partitions: one FAT32 boot partition and one Linux root partition (ext4, btrfs, etc.). This is also true for Arch Linux ARM when it is booted from an SD card. With NFS booting all data is loaded from a single location and there is no separation between the boot files and the data files. This unnecessary entry must be removed, or otherwise the boot process could get stuck looking for an SD card that might not be available.
Offer bootcode.bin at a central location:
cp /opt/piserver/base/boot/bootcode.bin /opt/piserver/root
This is only needed if you want to boot older Raspberry Pi models as well. Although each Pi will have its own directory, bootcode.bin is loaded from a central location if an older Pi network boots from ROM. This is because the device does not identify itself over TFTP using its serial number at this early stage of the boot process.
Copy the base image to an image specific for the Raspberry Pi
This action must be done for each network booting Pi, to give it its own file system:
Run:
rsync -aAXq /opt/piserver/base/ /opt/piserver/root/<serial>/
Where <serial> is the serial number of the Raspberry Pi (e.g. a1b2c3d4). Be careful not to remove the slash at the end of the path.
Now edit /opt/piserver/root/<serial>/boot/cmdline.txt and replace <serial> with the serial number of the Raspberry Pi.
Test boot
Connect the Pi to the test network interface and power it on. It should boot up as if it was done from an SD card.
Appendix A: Pi 4B boot analysis
The following dhcpd.conf configuration file is used in this post:
log-facility local7;

authoritative;
default-lease-time 86400;
max-lease-time 86400;

option local-rootpath     code 17 = text;                # Server - RFC 2132, 3.19
option local-vendorinfo   code 43 = text;                # Server - RFC 2132, 8.4
option local-parmreqlist  code 55 = string;              # Client - RFC 2132  9.8
option local-vendorid     code 60 = text;                # Client - RFC 2132, 9.13
option local-servername   code 66 = ip-address;          # Server - RFC 2132, 9.4
option local-piservername code 66 = text;
option local-bootfile     code 67 = text;                # Server - RFC 2132, 9.5
option local-architecture code 93 = unsigned integer 16; # Client - RFC 4578, 2.1
option local-netinfid     code 94 = string;              # Client - RFC 4578, 2.2
option local-machineid    code 97 = string;              # Client - RFC 4578, 2.3

# Identifies Raspberry Pis and offers them additional
# DHCP options required for network boot. Optionally,
# specific Pis are chosen for network booting based
# on MAC address (24 bit unique value) or Pi serial
# number (32 bit unique value).
# Note that identification by Pi serial number only
# works with Raspberry Pi model 3B+ or with an
# updated bootcode.bin on older Pi models.
class "raspberrypi" {
  match if (
    (
          # Parameter list from Pi 3B ROM and old bootcode.bin
          binary-to-ascii(10,8,",",option local-parmreqlist) =
            "43,60,67,128,129,130,131,132,133,134,135,66"
          # Parameter list from Pi 3B+ ROM and newer bootcode.bin
       or binary-to-ascii(10,8,",",option local-parmreqlist) =
            "43,60,67,128,129,130,131,132,133,134,135,66,1,3"
          # Parameter list from Pi 4B EEPROM boot code (2019-10-16)
       or binary-to-ascii(10,8,",",option local-parmreqlist) =
            "1,3,43,60,66,67,128,129,130,131,132,133,134,135"
    )
    and option local-vendorid =
      "PXEClient:Arch:00000:UNDI:002001"
    and option local-architecture =
      00:00    # Architecture: Intel x86PC
    and option local-netinfid =
      01:02:01 # Network Interface ID: UNDI 2.1
    and substring(option local-machineid,0,1) =
      00       # Machine identifier type: GUID
    and substring(hardware,0,1) =
      01       # Interface type: Ethernet
    and (
         substring(hardware,1,3) =
           b8:27:eb # Pi Foundation OUI listing
      or substring(hardware,1,3) =
           dc:a6:32 # Raspberry Pi Trading Ltd OUI listing
    )
#  ) and (
#    (
#          # MAC address identification
#          # Pi 1B+, Pi 2B, Pi 3B, Pi 3B+ (derived from serial number)
#          substring(hardware,1,6) = b8:27:eb:BB:CC:D1
#       or substring(hardware,1,6) = b8:27:eb:BB:CC:D2
#          # Pi 4B (programmed at manufacture)
#       or substring(hardware,1,6) = dc:a6:32:FE:DC:B1
#    )
#  ) and (
#    (
#          # Pi serial identification
#          reverse(1,suffix(option local-machineid,4)) = AA:BB:CC:D1
#       or reverse(1,suffix(option local-machineid,4)) = AA:BB:CC:D2
#    )
  );

  option local-vendorinfo "Raspberry Pi Boot   ";
  option local-piservername "192.168.47.1";
}

group {
  subnet 192.168.47.0 netmask 255.255.255.0 {
    pool {
      range 192.168.47.128 192.168.47.254;
      option subnet-mask 255.255.255.0;
      #option routers 192.168.47.1;
      #option domain-name-servers 192.168.47.1;
    }
  }
}
This configuration file is quite similar to the one used in my previous post on how to network boot older Pi models. An analysis was already given in that post, so here I will only focus on the Pi 4B specific parts.
Network booting a Pi 4B is not so much different compared to the previous models. The Pi 4B uses a new (sequential) order for requesting DHCP parameters, but still not all requested parameters make sense (nor do they have to be answered). Also, the Pi 4B uses a new OUI listing for its MAC address, which is not derived from its serial number. Therefore, both the serial number (32 bit) and the last three bytes of the MAC address (24 bit) can be combined to uniquely identify Raspberry Pis if needed. Due to that these two values are (or should be) assigned to Pis randomly and independent from each other, it is extremely unlikely to have two devices with the same (56 bit) combination of values. Of course, having two Pi 4Bs with the same MAC address (‘only’ 24 bit uniqueness) would still cause issues if they are in the same network. This is unlikely to happen, but be wary.
It is unfortunate that the Pi 4B also identifies itself as a PXE capable device, which it definitely is not. An argument could be made that this is done for consistency with older Pi models, but it is a bit sloppy.
Still, an EEPROM which can be updated (and shipped with new code from the factory) offers room for improvement, both for network booting and for other boot methods. For example, the Pi 4B is currently incapable of booting from USB. The Pi 3B(+) can actually do this, and it can be expected that this function will be added to the Pi 4B in the future.
The rpi-eeprom Git repository is quite active. Keep track of new EEPROM releases there.
Appendix B: Pi 4B EEPROM recovery procedure
A bad update can leave a Pi 4B unbootable. To fix this:
- Download the latest stable recovery boot files from the official Raspberry Pi website.
- Extract the files to the root directory of a FAT32-formatted microSD card.
- Insert the microSD card in the Pi 4B, power it on and wait for the green LED to flash quickly.
When you put the microSD card back in your computer you should see that recover.bin was renamed to RECOVER.000. This indicates that the EEPROM was updated, and the Pi 4B should be bootable again.