
Arch Linux ARM network boot on Raspberry Pi
Foreword
In this post I explain the ins and outs of network booting Raspberry Pis. Some Raspberry Pi models can do this without local persistent storage, and most other modelsc can boot with a minimum of data from an SD card. The operating system used is Arch Linux ARM. After booting the system and as long as it has a network connection to a server hosting the Pi’s file system, it can be used as any other Pi that was booted from an SD card.
About Raspberry Pi network boot
The first Raspberry Pis (the Pi 1B-series and the first revision of the Pi 2B) were released with a Broadcom BCM2835 or BCM2836 system on chip (SoC). These systems can only boot from an SD card. The Rasperry Pi 3B launched with a Broadcom BCM2837A0, and with that came the ability to boot from USB mass storage devices and the onboard USB Ethernet controller. The BCM2837A0 was also fitted on the latest revision of the Raspberry Pi 2, giving it these capabilities as well. A newer model SoC was later released for the Raspberry Pi 3 B+, the BCM2837B0. This SoC also supports network boot, and fixes many issues its predecessor has.
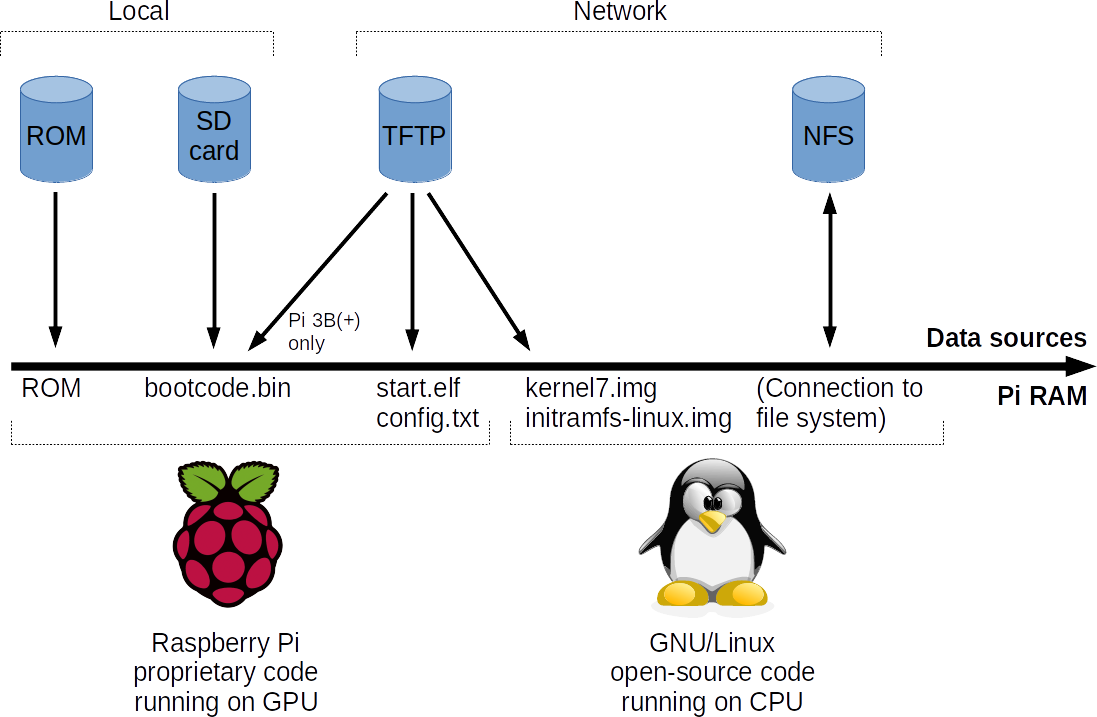
A typical Raspberry Pi boot is shown in the above figure. Note that this figure takes some liberties to simplify the drawing. For example, the loaded kernel name can be different depending on the used architecture. Other files can also be loaded in the boot process, depending on the boot configuration.
A Pi’s boot process is always started by the GPU using proprietary code. All Pi SoCs use the same GPU, but each SoC model has different boot code in ROM embedded (32 KB in size). The boot ROM determines how the next stage (bootcode.bin) loads. As the name implies, this concerns memory that is read-only. The boot ROM on older Pis (BCM2835/BCM2836-based) can only load bootcode.bin from an SD card. The file bootcode.bin can be updated, and newer versions include network boot support. It is possible to put bootcode.bin on an SD card to give most older Pi models that have an integrated Ethernet controller the ability to network boot. In this case the SD card must be in the device when the system is booted, but it only has to be written to when the boot code is updated.
Boot code from ROM or from bootcode.bin uses a Pi’s embedded Ethernet controller to request an IP address and some configuration parameters through DHCP. These parameters consist of a static string that incdicates to the Pi that the DHCP server knows it is a Pi that wants to network boot, and optionally an IP address of a server from which files will be loaded through TFTP. If the static string is not provided, the Pi will not network boot. If the IP address is omitted, the Pi will use the IP address of the DHCP server to request files from.
The job of bootcode.bin is to load and execute the next boot stage, contained in start.elf. Almost every Pi with an embedded Ethernet controller that is started with an updated bootcode.bin can do this using TFTP, including older Pi’s that do not have native network boot support.
When network booting, a Pi will first try to get bootcode.bin if its initial boot code was loaded from ROM. The second file in the boot process is start.elf, which the Pi will get from the server after bootcode.bin has been executed (either from ROM or from an SD card). It will first attempt to get start.elf from the TFTP server from a directory based on the Pi’s serial number. If this succeeds, the rest of the boot files will also be loaded from the Pi’s own boot directory on the TFTP server. This function allows each Pi to have its own boot files. If it fails to get start.elf from its own directory, the Pi will attempt to get start.elf and the other boot files from the root directory instead.
Another loaded file is config.txt. This file determines which boot files to load next, and can freely be configured by the Linux distribution or by the user. This file only determines which files are loaded, not from where they are retrieved. Their base location has been determined earlier by start.elf.
The most important data that start.elf loads into memory are a kernel, an initial ramdisk and the kernel parameters. After everything is loaded, the GPU enables the CPU with the kernel as the starting execution point. From this point on, the boot process is handled further by third-party code, such as Linux.
The operating system does not know by itself that the system was booted using network boot. Aside of the kernel, only the initial ramdisk and kernel parameters are loaded in memory. These must be prepared in such a way that they configure the operating system to access the root file system over the network.
There are different network protocols for remotely providing a file system, and potentially all are usable for network booting.
Some provide a remote block device to write data to and read data from, such as NBD and iSCSI. On top of these it is possible to let the client use any file system.
There are also protocols that offer their own file system, such as NFS and SMB. Where NBD and iSCSI let the client manage the filesystem stored on the server’s disk as a block device, NFS and SMB let the server deal with this. In practice, this often means that the files of the Raspberry Pi will be hosted on a disk file system managed by the server. The Raspberry Pi is unaware of the on-disk file system.
For this guide NFS is used. It is a protocol that is easy to configure and use, without worrying about block devices.
Prerequisites
- An Arch Linux or Arch Linux ARM server, to provide a DHCP server and to host Raspberry Pi file systems through TFTP and NFS.
- A Raspberry Pi with an onboard Ethernet controller and a microSD card. The microSD card is initially needed to prepare a network bootable Linux distribution before it is copied to the server. Also, a microSD card is needed to kickstart reliable network booting on older Pi models.
See the table below with more information for each Raspberry Pi model.
| Pi Model | System on Chip | Can network boot | Needs SD card for network boot | Note |
|---|---|---|---|---|
| Pi 1B | BCM2835 | ❌ | N/A | The original Pi is the only unsupported model. |
| Pi 1B+ | BCM2835 | ✔ | ✔ (read-only) | |
| Pi 2B | BCM2836 | ✔ | ✔ (read-only) | Hardware revision v1.1. |
| Pi 2B | BCM2837A0 | ✔ | ❌ | Hardware revision v1.2. Network boot without an SD card has several bugs and limitations, and is not recommended. |
| Pi 3B | BCM2837A0 | ✔ | ❌ | Network boot without an SD card has several bugs and limitations, and is not recommended |
| Pi 3B+ | BCM2837B0 | ✔ | ❌ | Works out of the box without an SD card. |
Network booting a BCM2837A0 from ROM is not recommended due to the many issues it has. For example, if the DHCP server processes the DHCP request too quickly the boot process will stall. Even the type of network switch and other packets in the same network segment might make a difference between a successful boot and a ‘dead’ Pi. In my tests with a Raspberry Pi 3B I encountered so many issues that I recommend to simply boot this model using an SD card to kickstart the network boot process, in the same way that is required for older SoC models.
Server configuration
This section assumes you use an Arch Linux (ARM) server that will serve DHCP, TFTP and NFS on a separate network interface only connected to Raspberry Pi clients. The server’s IP adress on this separate network is 192.168.47.1.
It is recommended to first use the information in this section to create a clean test environment, containing remotely booting Pis and the server on a separate network. After everything works as intended, the DHCP, TFTP and NFS services and settings can be integrated in an existing network infrastructure.
Prepare storage
For this configuration it is assumed that the server will host all files. Some configuration of the file system is needed to make the configuration easier and manageable.
Run:
mkdir -p /opt/piserver/root

mkdir -p /srv/tftp/pi
mount --bind /opt/piserver/root /srv/tftp/pi
echo "/opt/piserver/root /srv/tftp/pi  none   bind   0   0" >> /etc/fstab

mkdir -p /srv/nfs/pi
mount --bind /opt/piserver/root /srv/nfs/pi
echo "/opt/piserver/root /srv/nfs/pi  none   bind   0   0" >> /etc/fstab
With this configuration, the TFTP server configuration points to /srv/tftp and the NFS server points to /srv/nfs. This makes reconfiguration easier if data ever has to be moved. Simply adjust /etc/fstab after a data migration and reboot. There is no need to go into individual server configuration files.
/opt/piserver/root will contain a subdirectory with a full file system for each Raspberry Pi. The name of each subdirectory will be the Pi’s serial number.
Install and configure TFTP
TFTP is used for the first network boot stage. The Pi’s binary blobs, boot configuration parameters, the Linux kernel and the initial ramdisk are transferred through TFTP when booting.
Start by installing TFTP server software:
pacman -S tftp-hpa
Configure the TFTP server:
echo 'TFTPD_ARGS="--map-file /etc/tftpd.mapfile \
--address 192.168.47.1 --secure /srv/tftp/"' > /etc/conf.d/tftpd
Create a TFTP server mapping file /etc/tftpd.mapfile with the following content:
# Deny all uploads
Pa .*

# Allow download of bootcode.bin, and redirect the request to the Pi subdirectory
Gre ^bootcode\.bin$ pi/bootcode\.bin

# Only allow download of files
# - Starting with a single directory path, containing
#   - 8 lower case hex characters
# - Optionally from the "overlays" subdirectory
# - With a file name that must
#   - contain characters that are (and/or)
#     - alphanumeric (case insensitive)
#     - underscore (_)
#     - dash (-)
#   - optionally (XOR)
#     - Have a file extension as part of the file name
#     - Is a hidden file
Ga~ ^[0-9a-f]{8}/(overlays/)?[0-9A-Za-z_\-]*\.?[0-9A-Za-z_\-]+$

# Rewrite the request
# - Add 'pi/' to the beginning of the request
# - Add 'boot/' after the first directory name (Pi serial number) of the request
Gre ^([0-9a-f]{8}/)(.+)$ pi/\1boot/\2
Start the TFTP server:
systemctl enable tftpd
systemctl start tftpd
Install and configure NFS
Start by installing NFS server and client support software:
pacman -S nfs-utils
Configure the NFS server to only listen on the relevant network interface:
echo "[nfsd]" >> /etc/nfs.conf
echo "host=192.168.47.1" >> /etc/nfs.conf
Create an NFS share:
echo "/srv/nfs 192.168.47.0/24(crossmnt,rw,fsid=0,no_root_squash,no_subtree_check)" >> /etc/exports
Enable and start the NFS server, and see the available NFS share:
systemctl enable nfs-server
systemctl start nfs-server
exportfs -v
Install and configure an NTP server
A stock Raspberry Pi does not have a battery to store the current time whenever it is offline. Without going into details, it is safe to say that unsynchronized clocks between computers cause a range of unwanted problems.
Strictly speaking, a self-hosted NTP server is not necessary. Raspberry Pis can synchronize their time using servers on the Internet. However, it is assumed that the Raspberry Pis will run in an isolated test environment, and that can mean that there is no direct internet connection. Therefore the server also has to provide NTP services.
Install NTP server software:
pacman -S ntp
Configure the NTP server software to only listen and serve time synchronization requests on the relevant network interface:
echo "" >> /etc/ntp.conf
echo "interface ignore wildcard" >> /etc/ntp.conf
echo "interface listen 192.168.47.1" >> /etc/ntp.conf
echo "restrict 192.168.47.0 255.255.255.0" >> /etc/ntp.conf
Enable and start the NTP server:
systemctl enable ntpd
systemctl start ntpd
Install and configure DHCP
DHCP is the protocol that provides a booting Raspberry Pi both an IP address and part of its boot configuration.
Many tutorials on the Internet will refer to dnsmasq, which integrates a DHCP server, DNS server, a TFTP server and other services. While fine for small deployments, it lacks detailed low-level network configuration by abstracting away common configuration values. To better explain the boot process, I will be using the Internet Systems Consortium DHCP Server, which provides an open-source de-facto reference standard for DHCP.
Install the DHCP server:
pacman -S dhcp
Replace the contents of the default /etc/dhcpd.conf with:
log-facility local7;

authoritative;
default-lease-time 86400;
max-lease-time 86400;

option local-rootpath     code 17 = text;                # Server - RFC 2132, 3.19
option local-vendorinfo   code 43 = text;                # Server - RFC 2132, 8.4
option local-parmreqlist  code 55 = string;              # Client - RFC 2132  9.8
option local-vendorid     code 60 = text;                # Client - RFC 2132, 9.13
option local-servername   code 66 = ip-address;          # Server - RFC 2132, 9.4
option local-piservername code 66 = text;
option local-bootfile     code 67 = text;                # Server - RFC 2132, 9.5
option local-architecture code 93 = unsigned integer 16; # Client - RFC 4578, 2.1
option local-netinfid     code 94 = string;              # Client - RFC 4578, 2.2
option local-machineid    code 97 = string;              # Client - RFC 4578, 2.3

# Identifies Raspberry Pis and offers them additional
# DHCP options required for network boot. Optionally,
# specific Pis are chosen for network booting based
# on MAC address (24 bit unique value) or Pi serial
# number (32 bit unique value).
# Note that identification by Pi serial number only
# works with Raspberry Pi model 3B+ or with an
# updated bootcode.bin on older Pi models.
class "raspberrypi" {
  match if (
    (
          # Parameter list from Pi 3B and old bootcode.bin
          binary-to-ascii(10,8,",",option local-parmreqlist) =
            "43,60,67,128,129,130,131,132,133,134,135,66"
          # Parameter list from Pi 3B+ and newer bootcode.bin
       or binary-to-ascii(10,8,",",option local-parmreqlist) =
            "43,60,67,128,129,130,131,132,133,134,135,66,1,3"
    )
    and option local-vendorid =
      "PXEClient:Arch:00000:UNDI:002001"
    and option local-architecture =
      00:00    # Architecture: Intel x86PC
    and option local-netinfid =
      01:02:01 # Network Interface ID: UNDI 2.1
    and substring(option local-machineid,0,1) =
      00       # Machine identifier type: GUID
    and substring(hardware,0,1) =
      01       # Interface type: Ethernet
    and substring(hardware,1,3) =
      b8:27:eb # Pi Foundation OUI listing
#  ) and (
#    (
#          # MAC address identification
#          substring(hardware,1,6) = b8:27:eb:BB:CC:D1
#       or substring(hardware,1,6) = b8:27:eb:BB:CC:D2
#    )
#  ) and (
#    (
#          # Pi serial identification
#          reverse(1,suffix(option local-machineid,4)) = AA:BB:CC:D1
#       or reverse(1,suffix(option local-machineid,4)) = AA:BB:CC:D2
#    )
  );

  option local-vendorinfo "Raspberry Pi Boot   ";
  option local-piservername "192.168.47.1";
}

group {
  subnet 192.168.47.0 netmask 255.255.255.0 {
    pool {
      range 192.168.47.128 192.168.47.254;
      option subnet-mask 255.255.255.0;
      #option routers 192.168.47.1;
      #option domain-name-servers 192.168.47.1;
    }
  }
}
Some background information about this configuration file can be found in Appendix A.
Enable and start the DHCP server:
systemctl enable dhcpd4
systemctl start dhcpd4
The server is now configured. All it needs is a copy of the operating system that the Raspberry Pis need to run.
Pi Arch Linux ARM configuration
To prepare the operating system it is easiest to temporarily install it locally on a Raspberry Pi.
Preparing a Raspberry Pi 1B+/Pi 2B v1.1
No preparation is necessary. However, since the Pi is incapable of network booting using its boot ROM, it is required to prepare an SD card after the instructions in this section are followed.
Preparing a Raspberry Pi 2B v1.2/Pi 3B
It is recommended to follow the same procedure as for older Pi models. In that case no preparation is necessary, and an SD card will later be prepared to boot up the Raspberry Pi with better network code than which the boot ROM contains. Still, instructions are included for ROM-only booting, if you want to attempt this.
From the factory, USB boot modes (from mass storage devices and the onboard Ethernet controller) are disabled in the SoC. These have to be enabled.
Using the latest version of a supported Linux distribution (Raspbian, Arch Linux ARM, etc.), add the following line to /boot/config.txt:
program_usb_boot_mode=1
Reboot the device.
Verify that the modification was made successfully. On Raspbian, run:
vcgencmd otp_dump | grep 17:
On Arch Linux ARM, run:
/opt/vc/bin/vcgencmd otp_dump | grep 17:
The output should be:
17:3020000a
If it is, the USB boot modes are enabled.
Preparing a Raspberry Pi 3B+
No preparation is necessary.
Install Arch Linux ARM
There are official instructions for the Raspberry Pi 1B+, Raspberry Pi 2B and Raspberry Pi 3B-series. For the Pi 3B-series and Pi 2B (only revision v1.2), it is also possible to run Linux from a USB mass storage device if an SD card is not available, but this is outside the scope of this document.
Note that for the Pi 3B-series and Pi 2B v1.2 the ARMv7 installation should be used. Avoid the AArch64 installation.
This section assumes that the official instructions were followed and that the user alarm (default password: alarm) is logged in, either locally or through SSH.
For preparation of the operating system an internet connection is required. In this step there is no interaction between the server and the Pi. Therefore, the Pi does not have to be connected to the test network, and can be connected to a network that provides internet access.
Update the operating system and install required packages
This is quite straightforward:
su root # Password is 'root' by default
pacman-key --init
pacman-key --populate archlinuxarm
wifi-menu # Only if a wireless network is needed to get internet access
pacman -Syu --needed nfs-utils mkinitcpio-nfs-utils
Arch Linux ARM has a rolling release cycle, and partial upgrades are not supported. To install new software it is also required to upgrade the current software. This is all done in the last command.
Add NFSv4 root file system support:
Arch Linux (ARM) only supports NFSv3 for mounting the root file system. With some commands NSFv3 support can easily be replaced with support for NSFv4:
sed 's/nfsmount/mount.nfs4/' "/usr/lib/initcpio/hooks/net" \
  > "/usr/lib/initcpio/hooks/netnfs4"
cp /usr/lib/initcpio/install/net{,nfs4}
Now add NFSv4 root file system support to the initial ramdisk:
sed -i '/^MODULES=/ s/)$/ nfs)/' /etc/mkinitcpio.conf
sed -i '/^BINARIES=/ s/)$/ \/usr\/bin\/mount.nfs4)/' /etc/mkinitcpio.conf
sed -i '/^HOOKS=/ s/)$/ netnfs4)/' /etc/mkinitcpio.conf
mkinitcpio -p linux-raspberrypi
Now add NTP client synchronization support:
echo "NTP=192.168.47.1" >> /etc/systemd/timesyncd.conf
timedatectl set-ntp true
The IP address of the NTP server has to be configured manually since requesting and using an address provided by DHCP would drop the network connection to the system’s root file system.
Workaround for Raspberry Pis with an internal wireless adapter, which must be reset after boot since the required firmware files are not available during boot:
echo '#!/usr/bin/env bash' > /opt/wireless-reset.sh
echo "rmmod brcmfmac && modprobe brcmfmac" >> /opt/wireless-reset.sh
chmod +x /opt/wireless-reset.sh

echo "[unit]" > /etc/systemd/system/wireless-reset.service
echo "Description=Resets the wireless network driver" \
  >> /etc/systemd/system/wireless-reset.service
echo "" >> /etc/systemd/system/wireless-reset.service
echo "[Service]" >> /etc/systemd/system/wireless-reset.service
echo "Type=oneshot" >> /etc/systemd/system/wireless-reset.service
echo "ExecStart=/opt/wireless-reset.sh" \
  >> /etc/systemd/system/wireless-reset.service
echo "" >> /etc/systemd/system/wireless-reset.service
echo "[Install]" >> /etc/systemd/system/wireless-reset.service
echo "WantedBy=multi-user.target" >> /etc/systemd/system/wireless-reset.service

systemctl enable wireless-reset
Before wrapping everything up, get the serial number of the Raspberry Pi:
cat /proc/cpuinfo | grep "^Serial" | tail -c 9
The serial number of a Raspberry Pi is a 32 bit value encoded as a lower case hex string of four bytes. This value is used during the boot process by a Pi to distinguish it from other Pis.
Turn off the Rasberry Pi cleanly:
shutdown now
Power down the Raspberry Pi and remove the SD card.
Prepare a network bootable distribution
With the data on the SD card and some small modifications it is now possible to make a NFS bootable Arch Linux ARM distribution on the server.
Copy the SD card content to the server
Connect the SD card with the server and run these commands:
pacman -S --needed rsync
mount /dev/mmcblk0p2 /mnt
mount /dev/mmcblk0p1 /mnt/boot
rsync -aAXq --exclude={"/dev/*","/proc/*","/sys/*","/tmp/*","/run/*","/mnt/*","/lost+found"} \
  /mnt/ /opt/piserver/base/
Alternatively, the contents of the SD card can be uploaded to the server using rsync and SSH. First install rsync on the server using the first command from the previous set of commands. After that, enable SSH login by root by adding the following line to /etc/ssh/sshd_config on the server:
PermitRootLogin yes
The configuration change might need a restart of the OpenSSH server:
systemctl restart sshd
Now it is possible to copy the files from the client to the server by running something like this on the client:
mount /dev/mmcblk0p2 /mnt
mount /dev/mmcblk0p1 /mnt/boot
rsync -aAXq --exclude={"/dev/*","/proc/*","/sys/*","/tmp/*","/run/*","/mnt/*","/lost+found"} \
  -e ssh /mnt/ root@192.168.47.1:/opt/piserver/base/
Replace 192.168.47.1 with the IP address of the server. If you get the error ‘bash: rsync: command not found’, ensure that rsync is also installed on the server.
In both copy actions above (directly on the server or through a client) partitions of /dev/mmcblk0 are used to mount the SD card. This assumes that a ‘direct’ SD card reader is used. If a USB connected SD card reader is used, check the output of dmesg and replace the device names accordingly. Expect partition device node names such as /dev/sdb2 and /dev/sdb1, to be mounted respectively at /mnt and /mnt/boot.
Reconfigure the distribution to boot from NFS
Adjust the boot parameters by editing /opt/piserver/base/boot/cmdline.txt and replacing its content with:
ip=:::::eth0:dhcp nfsroot=192.168.47.1:/pi/<serial>/ rw rootwait console=serial0,115200 console=tty1 selinux=0 plymouth.enable=0 smsc95xx.turbo_mode=N dwc_otg.lpm_enable=0 elevator=noop
Leave <serial> as it is written. After a copy is made of the base directory, this needs to be changed to the serial number of the Raspberry Pi.
Disable the systemd-networkd configuration of the wired network interface:
mv /opt/piserver/base/etc/systemd/network/eth0.network{,.disabled}
If the configuration would be enabled, the system would lose connection with its network file system when systemd-networkd would drop the current IP configuration to configure a new set.
Disable the mounting of a separate boot partition:
sed -i '/^\/dev\/mmcblk0p1/d' /opt/piserver/base/etc/fstab
A Raspberry Pi SD card often contains two partitions: one FAT32 boot partition and one Linux root partition (ext4, btrfs, etc.). This is also true for Arch Linux ARM when it is booted from an SD card. With NFS booting all data is loaded from a single location and there is no separation between the boot files and the data files. This unnecessary entry must be removed, or otherwise the boot process could get stuck looking for an SD card that might not be available.
Offer bootcode.bin at a central location:
cp /opt/piserver/base/boot/bootcode.bin /opt/piserver/root
Although each Pi will have its own directory, bootcode.bin is loaded from a central location if a Pi network boots from ROM. This is because a Pi does not identify itself over TFTP using its serial number at this early stage of the boot process.
Copy the base image to an image specific for the Raspberry Pi
Run:
rsync -aAXq /opt/piserver/base/ /opt/piserver/root/<serial>/
Where <serial> is the serial number of the Raspberry Pi (e.g. a1b2c3d4). Be careful not to remove the slash at the end of the path.
Now edit /opt/piserver/root/<serial>/boot/cmdline.txt and replace <serial> with the serial number of the Raspberry Pi.
Prepare the SD card to network boot older Pis
Follow these instructions only for Raspberry Pi models 1B+ and 2B v1.1. You can also use these instructions to upgrade the boot process of the Pi 2B v1.2 and Pi 3B to solve several bugs.
Remount the SD card on your computer if necessary and access the boot partition through /mnt/boot. Alternatively, boot the Pi again using the SD card and access the boot partition through /boot.
Run the following commands on your PC:
mount /dev/mmcblk0p2 /mnt
mount /dev/mmcblk0p1 /mnt/boot
mkdir /mnt/boot/sdbootbackup
mv /mnt/boot/* /mnt/boot/sdbootbackup
cp /mnt/boot/sdbootbackup/bootcode.bin /mnt/boot
sync
umount -R /mnt
Or run the following commands on your Raspberry Pi once it has booted.
mkdir /boot/sdbootbackup
mv /boot/* /boot/sdbootbackup
cp /boot/sdbootbackup/bootcode.bin /boot
sync
shutdown now
Insert/leave the SD card in your Raspberry Pi to network boot.
If you ever need to boot Linux from SD again, mount the SD card on your PC and run:
cp -rf /mnt/boot/sdbootbackup/* /mnt/boot/
Unmount, remove the SD card and put it back in your Raspberry Pi to boot Linux directly from SD again.
Test boot
Connect the Pi to the test network interface and power it on. It should boot up as if it was done from an SD card.
Reconfigure the ACT LED
If an SD card is not available the SD card reader on the Pi will report an error through the ACT (green) LED. To disable this, run on the Pi as root:
echo "none" > /sys/class/leds/led0/trigger
It is also possible to make the LED show USB activity. As long as no external USB devices are connected, it will act as a network activity LED since the Ethernet controller is connected through USB. Run:
echo "usb-host" > /sys/class/leds/led0/trigger
To configure the LED automatically after a reboot
echo "[Unit]" > /etc/systemd/system/set-led0-trigger.service
echo "Description=Reconfigures Raspberry Pi activity LED" >> /etc/systemd/system/set-led0-trigger.service
echo ""  >> /etc/systemd/system/set-led0-trigger.service
echo "[Service]" >> /etc/systemd/system/set-led0-trigger.service
echo "Type=oneshot" >> /etc/systemd/system/set-led0-trigger.service
echo 'ExecStart=/usr/bin/bash -c "echo \"usb-host\" > /sys/class/leds/led0/trigger"' >> /etc/systemd/system/set-led0-trigger.service
echo "" >> /etc/systemd/system/set-led0-trigger.service
echo "[Install]" >> /etc/systemd/system/set-led0-trigger.service
echo "WantedBy=multi-user.target" >> /etc/systemd/system/set-led0-trigger.service

systemctl enable set-led0-trigger
systemctl start set-led0-trigger
Appendix: DHCP server configuration explained
The following dhcpd.conf configuration file is used in this post:
log-facility local7;

authoritative;
default-lease-time 86400;
max-lease-time 86400;

option local-rootpath     code 17 = text;                # Server - RFC 2132, 3.19
option local-vendorinfo   code 43 = text;                # Server - RFC 2132, 8.4
option local-parmreqlist  code 55 = string;              # Client - RFC 2132  9.8
option local-vendorid     code 60 = text;                # Client - RFC 2132, 9.13
option local-servername   code 66 = ip-address;          # Server - RFC 2132, 9.4
option local-piservername code 66 = text;
option local-bootfile     code 67 = text;                # Server - RFC 2132, 9.5
option local-architecture code 93 = unsigned integer 16; # Client - RFC 4578, 2.1
option local-netinfid     code 94 = string;              # Client - RFC 4578, 2.2
option local-machineid    code 97 = string;              # Client - RFC 4578, 2.3

# Identifies Raspberry Pis and offers them additional
# DHCP options required for network boot. Optionally,
# specific Pis are chosen for network booting based
# on MAC address (24 bit unique value) or Pi serial
# number (32 bit unique value).
# Note that identification by Pi serial number only
# works with Raspberry Pi model 3B+ or with an
# updated bootcode.bin on older Pi models.
class "raspberrypi" {
  match if (
    (
          # Parameter list from Pi 3B and old bootcode.bin
          binary-to-ascii(10,8,",",option local-parmreqlist) =
            "43,60,67,128,129,130,131,132,133,134,135,66"
          # Parameter list from Pi 3B+ and newer bootcode.bin
       or binary-to-ascii(10,8,",",option local-parmreqlist) =
            "43,60,67,128,129,130,131,132,133,134,135,66,1,3"
    )
    and option local-vendorid =
      "PXEClient:Arch:00000:UNDI:002001"
    and option local-architecture =
      00:00    # Architecture: Intel x86PC
    and option local-netinfid =
      01:02:01 # Network Interface ID: UNDI 2.1
    and substring(option local-machineid,0,1) =
      00       # Machine identifier type: GUID
    and substring(hardware,0,1) =
      01       # Interface type: Ethernet
    and substring(hardware,1,3) =
      b8:27:eb # Pi Foundation OUI listing
#  ) and (
#    (
#          # MAC address identification
#          substring(hardware,1,6) = b8:27:eb:BB:CC:D1
#       or substring(hardware,1,6) = b8:27:eb:BB:CC:D2
#    )
#  ) and (
#    (
#          # Pi serial identification
#          reverse(1,suffix(option local-machineid,4)) = AA:BB:CC:D1
#       or reverse(1,suffix(option local-machineid,4)) = AA:BB:CC:D2
#    )
  );

  option local-vendorinfo "Raspberry Pi Boot   ";
  option local-piservername "192.168.47.1";
}

group {
  subnet 192.168.47.0 netmask 255.255.255.0 {
    pool {
      range 192.168.47.128 192.168.47.254;
      option subnet-mask 255.255.255.0;
      #option routers 192.168.47.1;
      #option domain-name-servers 192.168.47.1;
    }
  }
}
At the top a number of DHCP options are defined explicitly. Not all of them are used, but most of them are necessary for PXE network booting on x86 systems. I added unused options to clarify which common boot options are not used by Raspberry Pis.
The class section is used to identify a network booting Raspberry Pi using seven characteristics of the DHCP request, and to offer two options needed for network boot in the DHCP offer. Option 43 (local-vendorinfo) tells the Pi that the DHCP server is answering its request foor boot parameters, and option 66 (local-piservername) tells which TFTP server the Pi should connect to. If option 66 is omitted, the Pi will try to make a TFTP connection to the DHCP server’s IP address.
Despite the values that a Pi puts in its DHCP request, the Pi is not PXE compliant. First of all, the values it gives to identify itself in the options of the DHCP request are incorrect. A Pi is not an Intel x86PC since it runs an ARM CPU. It does not use an UNDI API since the network card is initiated on a much lower level by the GPU. Although the Pi does use some protocols that PXE uses (DHCP, TFTP) it only does so on a very basic level. There is not much of a ‘preboot execution environment’ at all.
Furthermore, common PXE DHCP values are ignored, such as option 17 (state a custom file path) and option 67 (state a custom filename for the boot image). Option 66 (state an alternative TFTP server) is supported, but not in a compliant way. As shown earlier in the configuration file, it is defined twice. Once as an IP address (local-servername) and once as text (local-piservername). This is done to offer compatibility with network booting (PXE) x86 systems, which require the former data type. The Raspberry Pi ignores this option if it is properly formatted for PXE. Instead, the IP address must be provided as a string. Something as short as C0:A8:2F:01 (4 bytes representing the IP 192.168.47.1) must for a Raspberry Pi be formatted as 31:39:32:2E:31:36:38:2E:34:37:2E:31 (12 bytes). This is not that critical concerning bandwidth or packet size, but it is something to keep in mind in mixed PXE/Pi network boot environments. In the example configuration, PXE clients can simply be configured with local-servername while Pis can be configured using local-piservername.
Some effort was made to ensure that Pis with a buggy BCM2837A0 can boot without an SD card. The parameter request list used to identify the Pi also contains a dataset for this older SoC, which does not request a subnet mask (option 1) or default gateway (option 3). Also, the Raspberry Pi Boot string contains three extra spaces, which is a workaround for a bug in the ROM code that calculates the text length incorrectly. These additions can be removed if only newer Raspberry Pis or a newer bootcode.bin is used to network boot.
Finally, there is support for uniquely identifying Raspberry Pis. The most compatible method is through the device’s MAC address. The last three bytes of a Pi’s MAC address match the last three bytes of its serial number. Therefore, this provides 24 bits of uniqueness.
Although it is possible to have two Raspberry Pis with the same last three bytes of the serial number (and therefore having the same MAC address), it is quite unlikely. To reduce the chance of duplicate identifiers further, it is possible to use a Raspberry Pi’s serial number directly. On the BCM2837B0 and in newer versions of the bootcode.bin file that can be used to make older Pis capable of network booting, the full (four byte) Pi serial number is offered in DHCP option 97. This increases the unique address space from 2^24 to 2^32 and makes it even more unlikely that two Pis will conflict.
Note that there still is a problem if two Pis with serial numbers that have the same last three bytes are located in the same network segment. Even if the first byte of the serial would be different, the MAC address would be the same. In this case, it would be better to put one conflicting Pi in a different network segment. Consider yourself ’lucky’ if this happens, since the probability of this happening is quite low.