
A reference guide to ZFS on Arch Linux


Using ZFS in Linux is not as simple as other file systems. The ZFS on Linux code is not integrated in the Linux kernel due to license issues. Therefore, native support by distributions is missing.
This does not mean that it is hard to add support for ZFS to an existing installation. On the contrary. In this guide it is shown that durable ZFS support can be added to Arch Linux with a few simple commands. In addition, a cheat sheet is provided to ease ZFS management.
ZFS basic concepts
The name ZFS is misleading, since it is not just a file system. ZFS manages all data abstraction between operating system and physical storage. It does so across four levels.
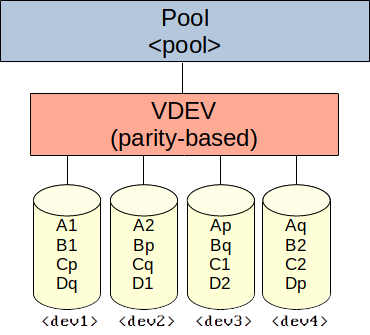
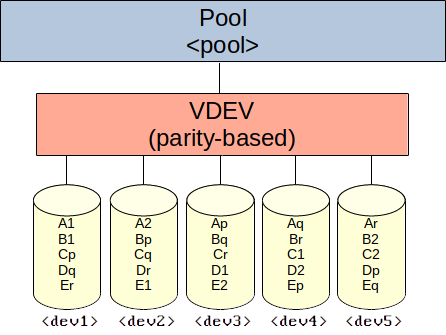
On the first and lowest level ZFS uses block devices, which are commonly hard drives and SSDs (or ‘disks’). One or more block devices are grouped into a VDEV (virtual device).
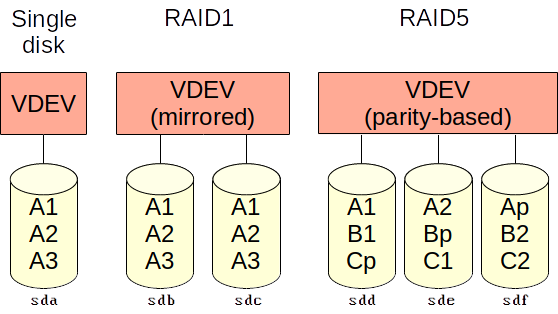
On the second level, a VDEV stores its data across a set of one or more disks. Data in a VDEV across multiple disks is either mirrored or parity-based. VDEVs offer redundancy similar to conventional redundant data storage methods that use multiple disks, such as RAID1 and RAID5.
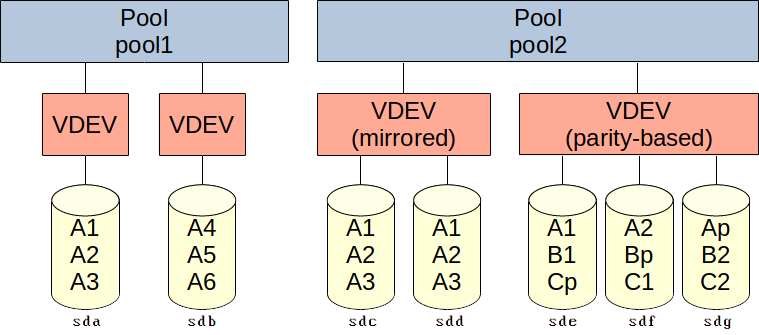
On the third level pools define one or more VDEVs. Data blocks in a pool are striped across VDEVs if their size is large enough. Smaller data blocks are stored in a single VDEV.
VDEVs can be added to a pool after the pool is created, but they cannot be removed. Disks can only be added to a VDEV if they are mirrored. Disks can only be removed from a VDEV if they are mirrored and if at least one disk remains after removal.
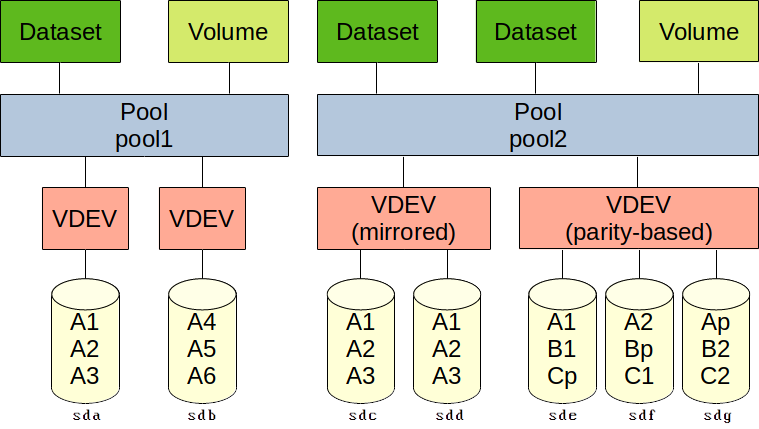
Pools support datasets and volumes, which represent the fourth level. A dataset offers a file system in which files and directories can be written, read and removed. Volumes are block devices that can be used for common purposes (swap space, iSCSI targets, etc.) while still offering many ZFS options. Examples include snapshots, compression and deduplication.
Note that pools are distinct from each other. They cannot share VDEVs. Datasets cannot be combined across pools. Volumes can be combined in theory, such as by making RAID sets across pools, but that would be unnecessary and inefficient.
When using disks with ZFS, do not partition them. ZFS takes care of that.
Add ZFS support to Arch Linux
This is the main part of this post. It concerns the addition of ZFS support to an Arch Linux installation.
A word of warning
Arch Linux is a distribution that by default runs the latest stable Linux kernel. A major kernel update can break OpenZFS support until a newer version of OpenZFS is released. It is recommended to run Arch Linux using the long-term support (LTS) Linux kernel. LTS releases have a lower major version (still supported, stable and secure), which should always be supported by the current OpenZFS release. Switching from the standard kernel to the LTS kernel is outside of the scope of this document. This switch can be started by running something like sudo pacman -S linux-lts linux-lts-headers, but remember that the system’s boot loader might have to be adjusted to boot the LTS kernel instead of the regular kernel.
Add ZFS support
This guide assumes that the standard kernel is used for ease of use. Additional notes are made for when an LTS kernel is used instead.
For this part of the guide all commands should be run as a normal user with sudo rights.
Arch Linux officially does not support ZFS. Unofficially it is supported through the Arch User Repository. To make installation and updating easier, an AUR helper is installed first.
First, install some prerequisites:
sudo pacman -S --needed base-devel
Now download and install the AUR helper known as pikaur:
mkdir ~/src
cd ~/src
curl -O https://aur.archlinux.org/cgit/aur.git/snapshot/pikaur.tar.gz
tar xf pikaur.tar.gz
cd pikaur
makepkg -sri
Adding ZFS support is as easy as:
pikaur -S linux-headers
pikaur -S dkms
pikaur -S spl-utils
pikaur -S spl-dkms
pikaur -S zfs-utils
pikaur -S zfs-dkms
The above commands assume that Arch Linux’ standard kernel is used. Ensure that the right headers are installed if another kernel was previously installed. The LTS kernel requires the package linux-lts-headers.
The total installation will be 10-15 minutes on a modern computer.
To ensure that ZFS pools are mounted after reboots, run:
sudo systemctl enable zfs-import-cache
sudo systemctl enable zfs-mount
sudo systemctl enable zfs-import.target
sudo systemctl enable zfs.target
sudo systemctl start zfs.target
Enable ZFS support without rebooting:
sudo modprobe zfs
Now test if ZFS works:
sudo zpool status
The command should report ’no pools available’.
Enable scheduled ZFS scrubbing
Create the following files:
/etc/systemd/system/zfs-scrub@.service
[Unit]
Description=Run scrub for ZFS pool %I

[Service]
Type=simple
ExecStart=/bin/zpool scrub %i
/etc/systemd/system/zfs-scrub@.timer
[Unit]
Description=Run weekly scrub for ZFS pool %I

[Timer]
OnCalendar=Wed *-*-* 15:02:00

[Install]
WantedBy=timers.target
Adjust the OnCalendar timer to the preferred day and time of the week to start scrubbing.
To enable scheduled scrubbing on a pool, run:
sudo systemctl enable zfs-scrub@<pool>.timer
sudo systemctl start zfs-scrub@<pool>.timer
ZFS cheat sheet
ZFS is quite extensive. The commands are clear, but a cheat sheet definitely helps when configuring a system.
Pool management
When creating pools, use -o ashift=9 for disks with a 512 byte physical sector size or -o ashift=12 for disks with a 4096 byte physical sector size. See lsblk -S -o NAME,PHY-SEC to get the physical sector size of each SCSI/SATA disk. Remove -S if you want the same value from all devices.
Do not use shorthand device names such as ‘sda’, ‘sdb’, etc. when referring to disks. These names are based on the order in which disks are presented to the operating system. This order can be changed by the disk controller. Use absolute disk IDs instead. You can get disk IDs from ls -al /dev/disk/by-id. First run cd /dev/disk/by-id to avoid having type the path multiple times. Good disk IDs to use from this location include model names and serial numbers for identification and distinctiveness.
List pool(s):
zpool list
List pool(s), their VDEV(s) and the disk(s) used by each VDEV.
zpool status
Show pool(s), their VDEV(s) and the disk(s) used by each VDEV, and information about storage capacity, read/write operations, used bandwidth and disk health statistics. Requires installation of smartmontools.
ZPOOL_SCRIPTS_AS_ROOT=yes zpool iostat -c smart
Export (unmount) pool:
zpool export <pool>
Import (mount) all pools:
zpool import -a
Create pool with a single VDEV using a single disk:
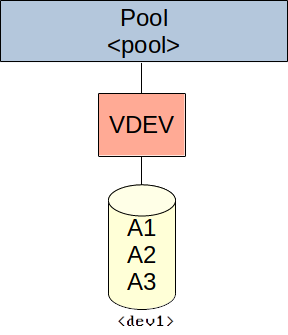
zpool create -f -o ashift=<ashift> <pool> disk <dev1>
Create pool with a multiple VDEVs, each with a single disk (similar to JBOD):
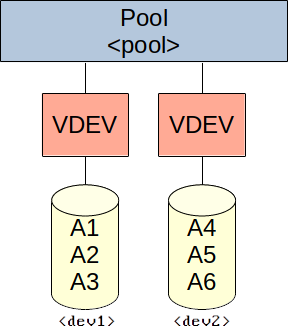
zpool create -f -o ashift=<ashift> <pool> disk <dev1> disk <dev2> [disk <devN> ...]
Create pool with a single, redundant VDEV using mirrored disks (similar to RAID 1):
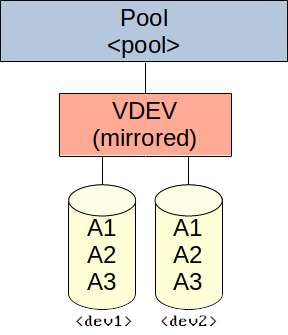
zpool create -f -o ashift=<ashift> <pool> mirror <dev1> <dev2> [<devN> ...]
Create pool with multiple redundant VDEVs using mirrored disks (similar to RAID 10):
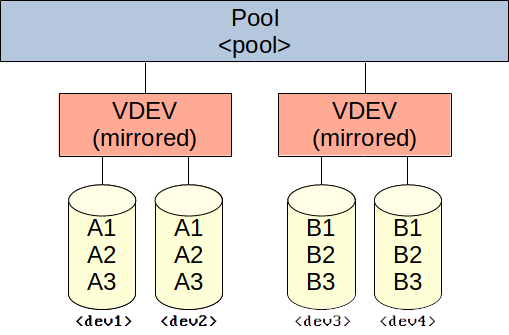
zpool create -f -o ashift=<ashift> <pool> mirror <dev1> <dev2> mirror <dev3> <dev4> [mirror <devN> <devN> ...]
Create pool with a single, redundant VDEV using striped disks (one disk redundant, similar to RAID 5):
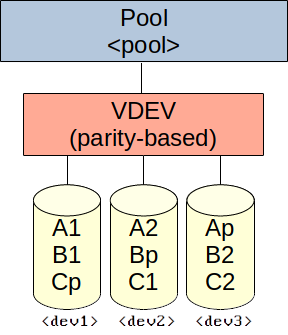
zpool create -f -o ashift=<ashift> <pool> raidz1 <dev1> <dev2> <dev3> [<dev4> ...]
Create pool with a single, redundant VDEV using striped disks (two disks redundant, similar to RAID 6):
zpool create -f -o ashift=<ashift> <pool> raidz2 <dev1> <dev2> <dev3> <dev4> [<devN> ...]
Create pool with a single, redundant VDEV using striped disks (three disks redundant):
zpool create -f -o ashift=<ashift> <pool> raidz3 <dev1> <dev2> <dev3> <dev4> <dev5> [<devN> ...]
Change a pool’s mount point:
zfs set mountpoint=<path> <pool>
Add a disk to a pool’s single disk or mirrored VDEV (make sure to include all existing disks of the VDEV in the command in addition to the new disk):
zpool attach <pool> <dev1> <dev2> [devN] ...
Remove a disk from a pool’s mirrored VDEV (DANGEROUS!):
zpool detach <pool> <dev>
Add a new single disk VDEV to an existing pool:
zpool add <pool> disk <dev1>
Add a new mirrored VDEV to an existing pool:
zpool add <pool> mirror <dev1> <dev2> [devN] ...
Add a new striped VDEV to an existing pool:
zpool add <pool> raidz1 <dev1> <dev2> <dev3> [devN] ...
zpool add <pool> raidz2 <dev1> <dev2> <dev3> <dev4> [devN] ...
zpool add <pool> raidz3 <dev1> <dev2> <dev3> <dev4> <dev5> [devN] ...
Destroy a pool (DANGEROUS!):
zpool destroy <pool>
Data store management
Definitions
Data store. A container in a ZFS pool that logically separates its data and mutations from other data stores in the same pool. It is either a dataset or a volume. Dataset. A data store containing a ZFS file system. Can be nested. Volume (also known as zvol). A data store containing block storage. Cannot be nested. Useful for iSCSI/Fibre Channel storage or swap space.
Commands
List pools and their data stores, including mount points of datasets:
zfs list
List pools, their data stores (including mount points of datasets), and snapshots:
zfs list -r -t all
Create a dataset:
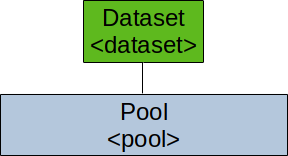
zfs create <pool>/<dataset>
Create a volume and see its device node:
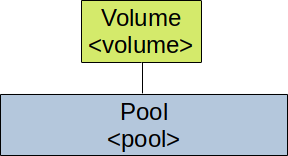
zfs create -V <size> <pool>/<volume>
ls -al /dev/zvol/<pool>
Rename a data store. The data store can be renamed (and moved) to any location within its own pool. Note that mount points can change due to this action.
zfs rename <datastoreold> <datastorenew>
Destroy a data store (DANGEROUS!)
zfs destroy <pool>/<datastore>
Pool and data store property management
Note
ZFS pools and data stores have many properties. Some are inheritable and some are editable. All properties can be ignored when using ZFS as a basic file system, but editing them is required to use some of its more powerful features. Not all properties will be discussed here.
Commands
See a list of all available properties:
zfs get
Write a list of all available properties to a file (for easy reading):
zfs get 2>&1 | tee <file>
See a list of all properties for all pools and data stores:
zfs get all
See a list of all properties for a specific pool or data store:
zfs get all <pool|datastore>
Write a list of all properties for all pools and data stores to a file (for easy reading):
zfs get all 2>&1 | tee <file>
Get the value of a specific property:
zfs get <property> <pool|datastore>
Change a mount point (inherits):
zfs set mountpoint=<path> <pool|dataset>
Enable compression (off by default, inherits):
zfs set compression=on <pool|datastore>
Get compression ratio:
zfs get compressratio <pool|datastore>
Enable deduplication (off by default, inherits):
zfs set dedup=on <pool|datastore>
Get dataset or volume deduplication efficiency:
zfs list
Compare the used size (data) to the referenced size (space). These values ignore the effects of compression.
Get pool deduplication efficiency:
zpool status -D <pool>
Compare the total referenced LSIZE (data) to the total allocated LSIZE (space). Note that LSIZE relates to uncompressed data. Examine the respective PSIZE values to see what deduplication does to actual disk space if compression is enabled.
The deduplication table’s memory consumption in bytes can be calculated by multiplying the number of DDT entries with the number of bytes for the core value.
Set a quota (none by default):
zfs set quota=<size> <pool|dataset>
Snapshot management
Definitions
Snapshot. Saved state of a data store at a certain point in time.
Commands
See all snapshots:
zfs list -r -t snapshot
See all snapshots in a specific pool/data store (and nested data stores):
zfs list -r -t snapshot <pool|datastore>
Create a snapshot:
zfs snapshot <pool|datastore>@<snapshot>
Create a snapshot, for the pool/data store and all nested data stores underneath:
zfs snapshot -r <pool|datastore>@<snapshot>
Rename a snapshot:
zfs rename <pool|datastore>@<oldsnapshot> <newsnapshot>
Rename all snapshots with the same name, in the pool/data store and all nested data stores underneath:
zfs rename -r <pool|datastore>@<oldsnapshot> <newsnapshot>
Roll back to the latest snapshot (DANGEROUS!):
zfs rollback <pool|datastore>@<snapshot>
Roll back to an older snapshot (DANGEROUS!):
zfs rollback -r <pool|datastore>@<snapshot>
Destroy a snapshot (DANGEROUS!):
zfs destroy <pool|datastore>@<snapshot>
To access files from a snapshot directly:
ls <pool directory>/.zfs/snapshot/<snapshot name>
Clone management
Definitions
Clone. Data store of which the initial contents are the same as the source snapshot. A snapshot from which clones are made cannot be removed until all clones are destroyed.
Commands
See if a data store is a clone from a snapshot. If the value is not empty, the data store is a clone from the snapshot stated in the value.
zfs get origin <datastore>
Create a clone from a snapshot (must be in the same pool, but otherwise there are no restrictions):
zfs clone <pool|datastore>@<snapshot> <datastore>/<clone>
Destroy a clone (DANGEROUS!):
zfs destroy <datastore>
Swap an original data store with a clone. This can be used to destroy an original data store on which a clone is based. The promote command performs the following actions sequentially:
- The
originproperty between the clone and the snapshot it was based on is removed. - The snapshot is re-assigned to the clone.
- The
originproperty of the original dataset from which the snapshot was part of is assigned to the snapshot.
zfs promote <clonedatastore>
Delegate ZFS file system management through permissions
ZFS has support for delegating commands and properties to users without root rights. See this list for more information about the permissions.
See a list of commands and properties to delegate, and how to delegate them to users and groups:
zfs allow
See delegated permissions (if any):
zfs allow <pool|datastore>
Allow a user to create snapshots (inherits):
zfs allow -u <user> snapshot <pool|datastore>
This is quite a useful command to delegate to backup service accounts, which can create a snapshot after a backup is finished.
Remove a user’s permission to manage snapshots:
zfs unallow -u <user> snapshot <pool|datastore>